Vauxhall/Opel Zafira-A 1,6 (2000-05) Engine code: Z16XE cambelt change instructionts and replacement inteval. Full guide!
Replacement Interval Guide
Vauxhall recommend: Corsa-C/Combo-C/Astra-G/Vectra-B/Zafira-A/Zafira-B:
- 1996MY – replacement every 40,000 miles or 4 years, whichever occurs first.
- 1997-02MY – replacement every 40,000 miles or 4 years, whichever occurs first (tensioner pulley must also be replaced).
- 2003MY – replacement every 60,000 miles or 6 years, whichever occurs first (tensioner pulley must also be replaced).
- Vectra-C:
- 2002ЅMY – replacement every 40,000 miles or 4 years, whichever occurs first (tensioner pulley must also be replaced).
- 2002ЅMY – replacement every 60,000 miles or 6 years, whichever occurs first (tensioner pulley must also be replaced).
Astra-H/Signum/Meriva:
- Replacement every 60,000 miles or 6 years (tensioner pulley must also be replaced).
All models:
- 2001MY guide pulley(s) must also be replaced.
The previous use and service history of the vehicle must always be taken into account.
Check For Engine Damage
CAUTION: This engine has been identified as an INTERFERENCE engine in which the possibility of valve-to-piston damage in the event of a timing belt failure is MOST LIKELY to occur.
A compression check of all cylinders should be performed before removing the cylinder head.
Repair Times – hrs
- Check and adjust 0,70
- Remove and install 1,30
Special Tools
- Flywheel locking tool – Kent Moore No.KM-911.
- Camshaft sprocket locking tool – Kent Moore No.KM-852.
- Engine support tool ( 2000 Astra/Zafira) – Kent Moore No.KM-6001.
- Engine alignment tool ( 2000 Astra/Zafira) – Kent Moore No.KM-909-B.
- Engine support tool (2000 Astra/Zafira) – Kent Moore No.KM-6001-A.
- Engine alignment tool (2000 Astra/Zafira) – Kent Moore No.KM-6173.
- Engine support tool (Corsa) – Kent Moore No.KM-6169-3.
- Engine alignment tool (Corsa) – Kent Moore No.KM-6169.
- Engine support tool (Vectra-C/Signum) – Kent Moore No.KM-6313.
- Auxiliary drive belt tensioner locking tool – Kent Moore No.KM-6130.
- Engine alignment tool ( 2004 Meriva) – Kent Moore No.KM-6169-1.
- Engine alignment tool (2004 Meriva) – Kent Moore No.KM-6394.
Special Precautions
- Disconnect battery earth lead.
- DO NOT turn crankshaft or camshaft when timing belt removed.
- Remove spark plugs to ease turning engine.
- Turn engine in normal direction of rotation (unless otherwise stated).
- DO NOT turn engine via camshaft or other sprockets.
- Observe all tightening torques.
Removal
WARNING: Certain engines require modification to tensioner pulley/guide pulleys due to possible failure. Refer to dealer.
1. Remove air filter housing.
2. Raise and support front of vehicle.
3. Remove:
- RH front wheel.
- RH inner wing panel.
- Engine top cover (if fitted).
4. Mark direction of rotation on auxiliary drive belt with chalk.
5. Turn auxiliary drive belt tensioner to release tension on belt. Use ring spanner.
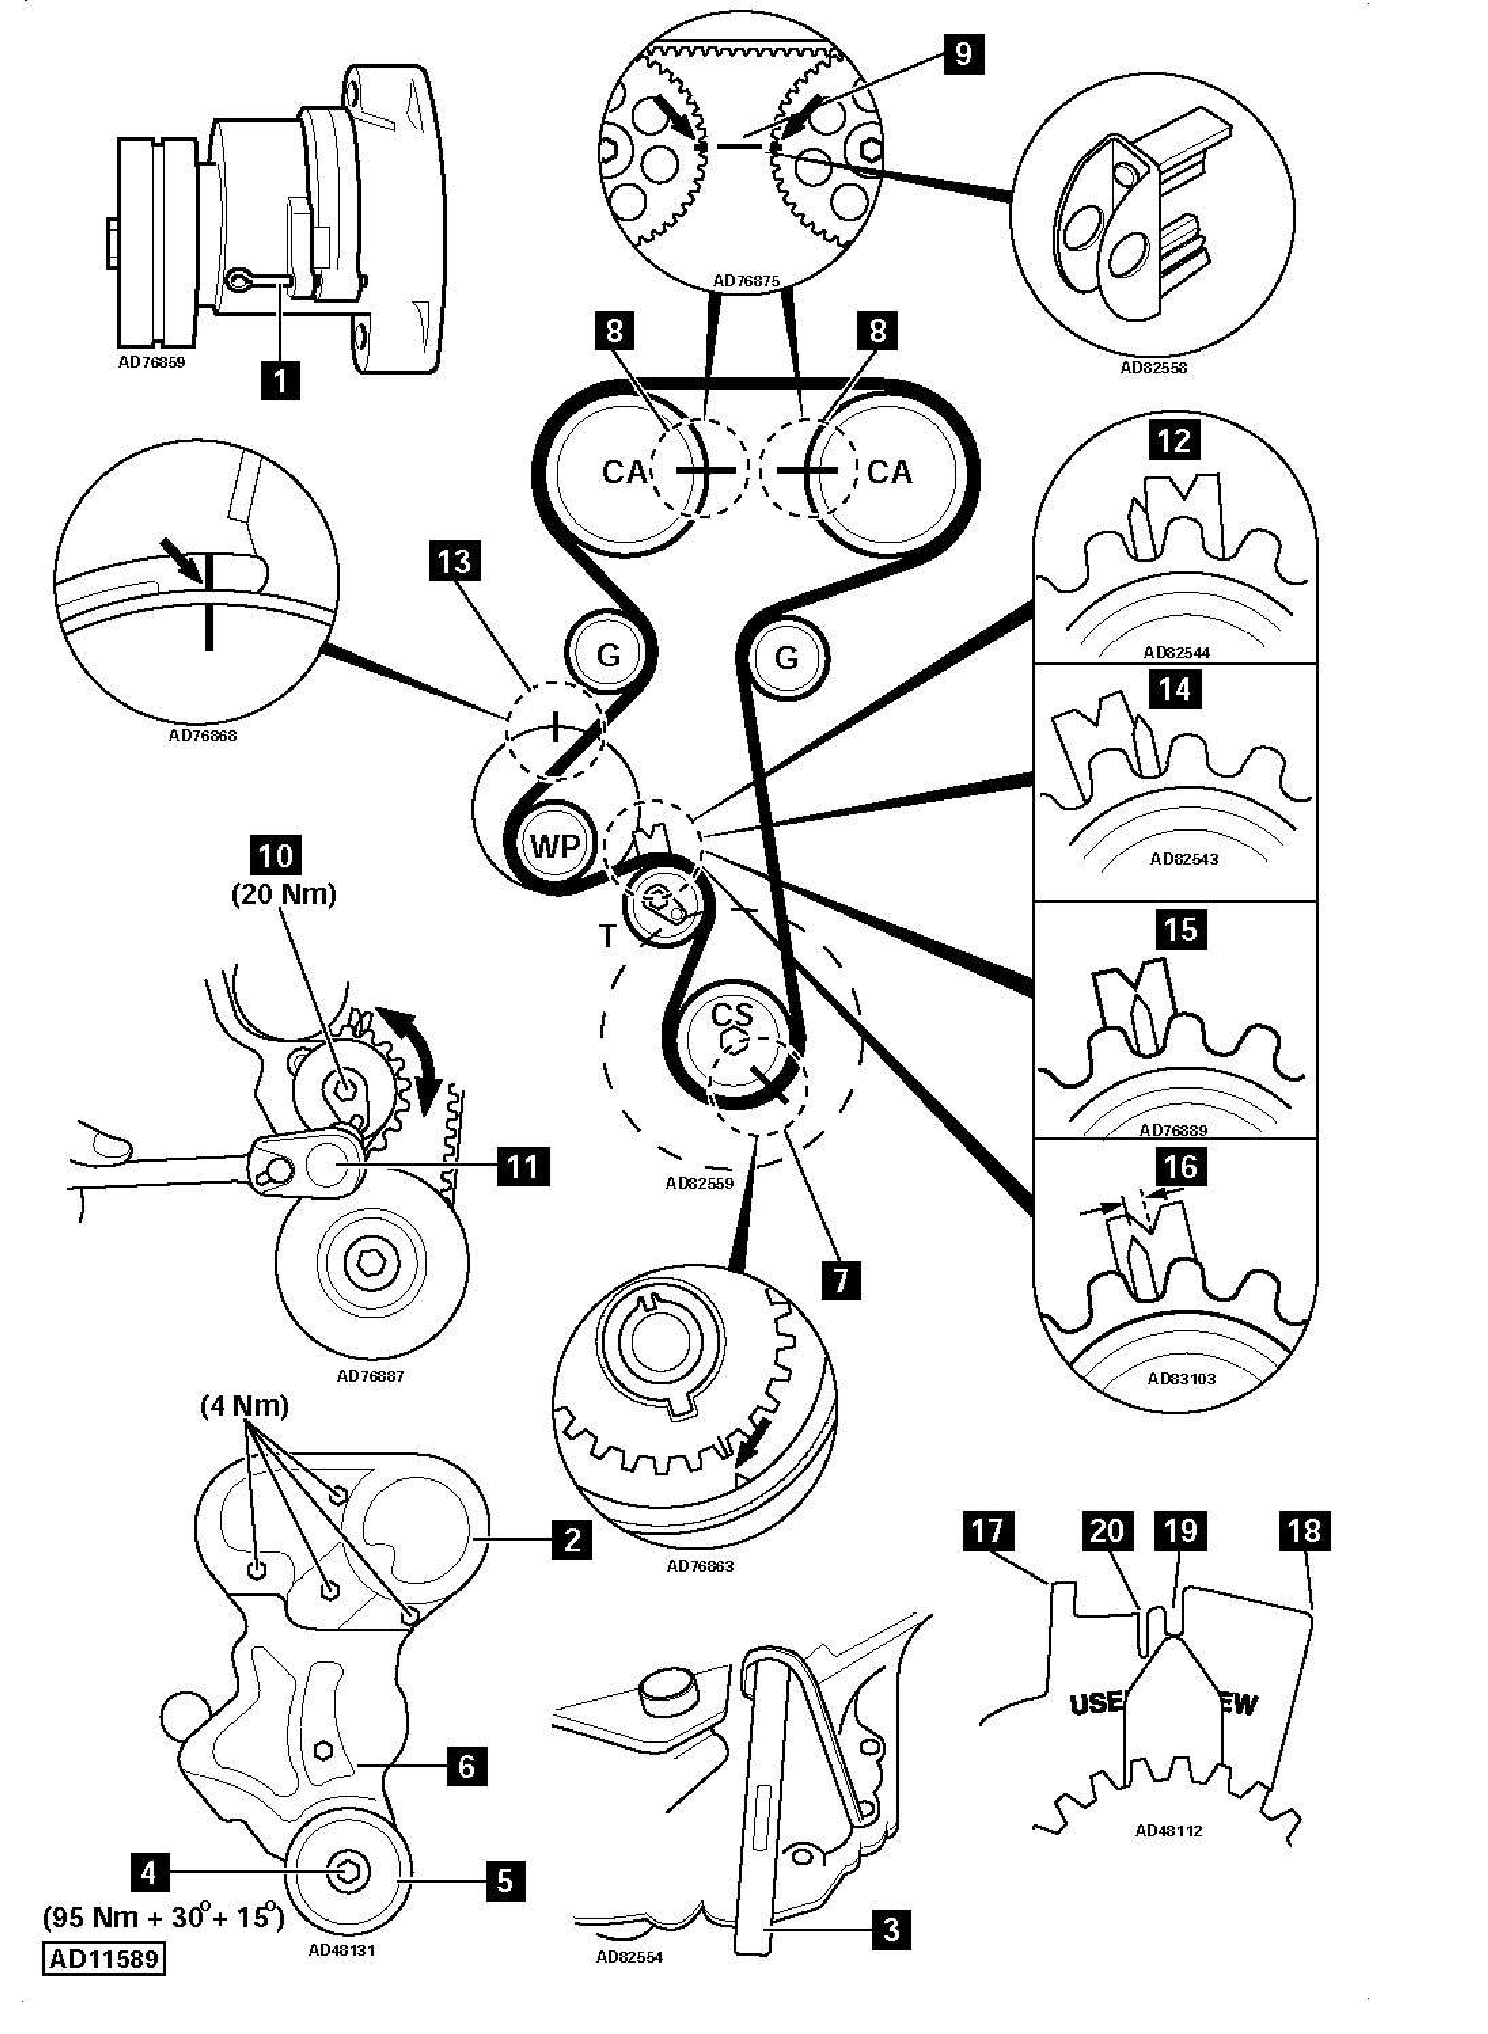
6. Insert 4 mm pin or locking tool No.KM-6130 through hole in tensioner and into mounting bracket [1] .
7. Remove:
- Auxiliary drive belt.
- Timing belt upper cover [2] .
8. Support engine:
- Astra/Zafira 2000: Use tool Nos.KM-6001/KM-909-B.
- Astra/Zafira 2000 : Use tool Nos.KM-6001-A/6173.
- Corsa: Use tool Nos.KM-6169-3/6169.
- Vectra-C/Signum: Use tool No.KM-6313.
- Meriva 2004: Use tool No.KM-6169-A.
- Meriva 2004 : Use tool No.KM-6394.
9. Corsa/Astra/Vectra-C/Signum/Zafira/Meriva – remove:
- Auxiliary drive belt tensioner.
- RH engine mounting and bracket.
10. Insert tool in bell housing to lock flywheel [3] . Tool No.KM-911.
11. Remove:
- Crankshaft pulley bolt [4] .
- Crankshaft pulley [5] .
- Timing belt lower cover [6] .
- Flywheel locking tool [3] .
- Camshaft position (CMP) sensor (if fitted).
12. Temporarily fit crankshaft pulley bolt [4] .
13. Turn crankshaft clockwise to TDC on No.1 cylinder. Ensure crankshaft timing marks aligned [7] .
14. Timing marks on camshaft sprockets must be aligned with upper edge of cylinder head [8] .
15. Lock camshaft sprockets. Use tool No.KM-852 [9] .
16. Slacken tensioner bolt [10] .
17. Turn tensioner clockwise until pointer on LH stop: Use Allen key [11] .
- Type 1 – [12] .
- Type 2 – [17] .
18. Lightly tighten tensioner bolt [10] .
19. Remove timing belt.
NOTE: Mark direction of rotation on belt with chalk if belt is to be reused.
Installation
1. Ensure mark on water pump aligned with mark on cylinder block [13] .
2. Ensure timing marks aligned [7] & [8] .
3. Fit timing belt in anti-clockwise direction, starting at crankshaft sprocket. Ensure belt is taut between sprockets.
4. Slacken tensioner bolt [10] .
5. Turn tensioner anti-clockwise until pointer on RH stop: Use Allen key [11] .
- Type 1 – [14] .
- Type 2 – [18] .
6. Lightly tighten tensioner bolt [10] .
7. Remove locking tool from sprockets [9] .
8. Turn crankshaft two turns clockwise. Ensure timing marks aligned [7] & [8] .
9. Lock camshaft sprockets. Use tool No.KM-852 [9] .
10. Slacken tensioner bolt [10] .
11. Turn tensioner clockwise until pointer aligned as follows:
- Type 1:
- New belt – ‘V’ notch in bracket [15] .
- Used belt – LH edge of ‘V’ notch [16] .
- Type 2:
- New belt – ‘NEW’ notch in bracket [19] .
- Used belt – ‘USED’ notch in bracket [20] .
12. Lightly tighten tensioner bolt [10] .
13. Remove locking tool from sprockets [9] .
14. Turn crankshaft slowly two turns clockwise. Ensure timing marks aligned [7] & [8] .
Check pointer aligned as follows:
15. Type 1:
- New belt – ‘V’ notch in bracket [15] .
- Used belt – LH edge of ‘V’ notch [16] .
- Type 2:
- New belt – ‘NEW’ notch in bracket [19] .
- Used belt – ‘USED’ notch in bracket [20] .
16. Tighten tensioner bolt to 20 Nm [10] .
17. Insert tool in bell housing to lock flywheel [3] . Tool No.KM-911.
18. Remove crankshaft pulley bolt [4] .
19. Install components in reverse order of removal.
NOTE: Observe direction of rotation marks on auxiliary drive belt.
20. Fit new crankshaft pulley bolt [4] . Tightening torque: 95 Nm + 30° + 15°.
21. Remove flywheel locking tool [3] .