| Manufacturer: Citroen | Model: C3 Pluriel 1,4 |
| Engine code: KFV (TU3JP) | Output: 54 (75) 5400 |
| Tuned for: R-Cat | Year: 2003-10 |
Repair Times – hrs
Camshaft drive belt/chain – R & I 2,40
Special Tools
• C3 III: Auxiliary drive belt tensioner pulley locking tool – Citroen No.0188-Q1.
• C3 III: Auxiliary drive belt tensioner pulley adjusting tool – Citroen No.0188-Z.
• Camshaft timing pin – Citroen No.4507-T.B or 0132-RZ.
• Flywheel timing pin – Citroen No.4507-T.A or 0132-QY.
• Tensioner retaining tool – Citroen No.4200-T.H or 0153-AL.
• Timing belt retaining clip – Citroen No.4533-T.AD or 0153-AE.
Special Precautions
• Disconnect battery earth lead.
• DO NOT turn crankshaft or camshaft when timing belt removed.
• Remove spark plugs to ease turning engine.
• Turn engine in normal direction of rotation (unless otherwise stated).
• DO NOT turn engine via camshaft or other sprockets.
• Observe all tightening torques.
Removal
1. Raise and support front of vehicle.
2. Remove:
- RH front wheel.
- RH splash guard.
- Auxiliary drive belt. C3 III: Use tool Nos.0188-Q1 & 0188-Z.
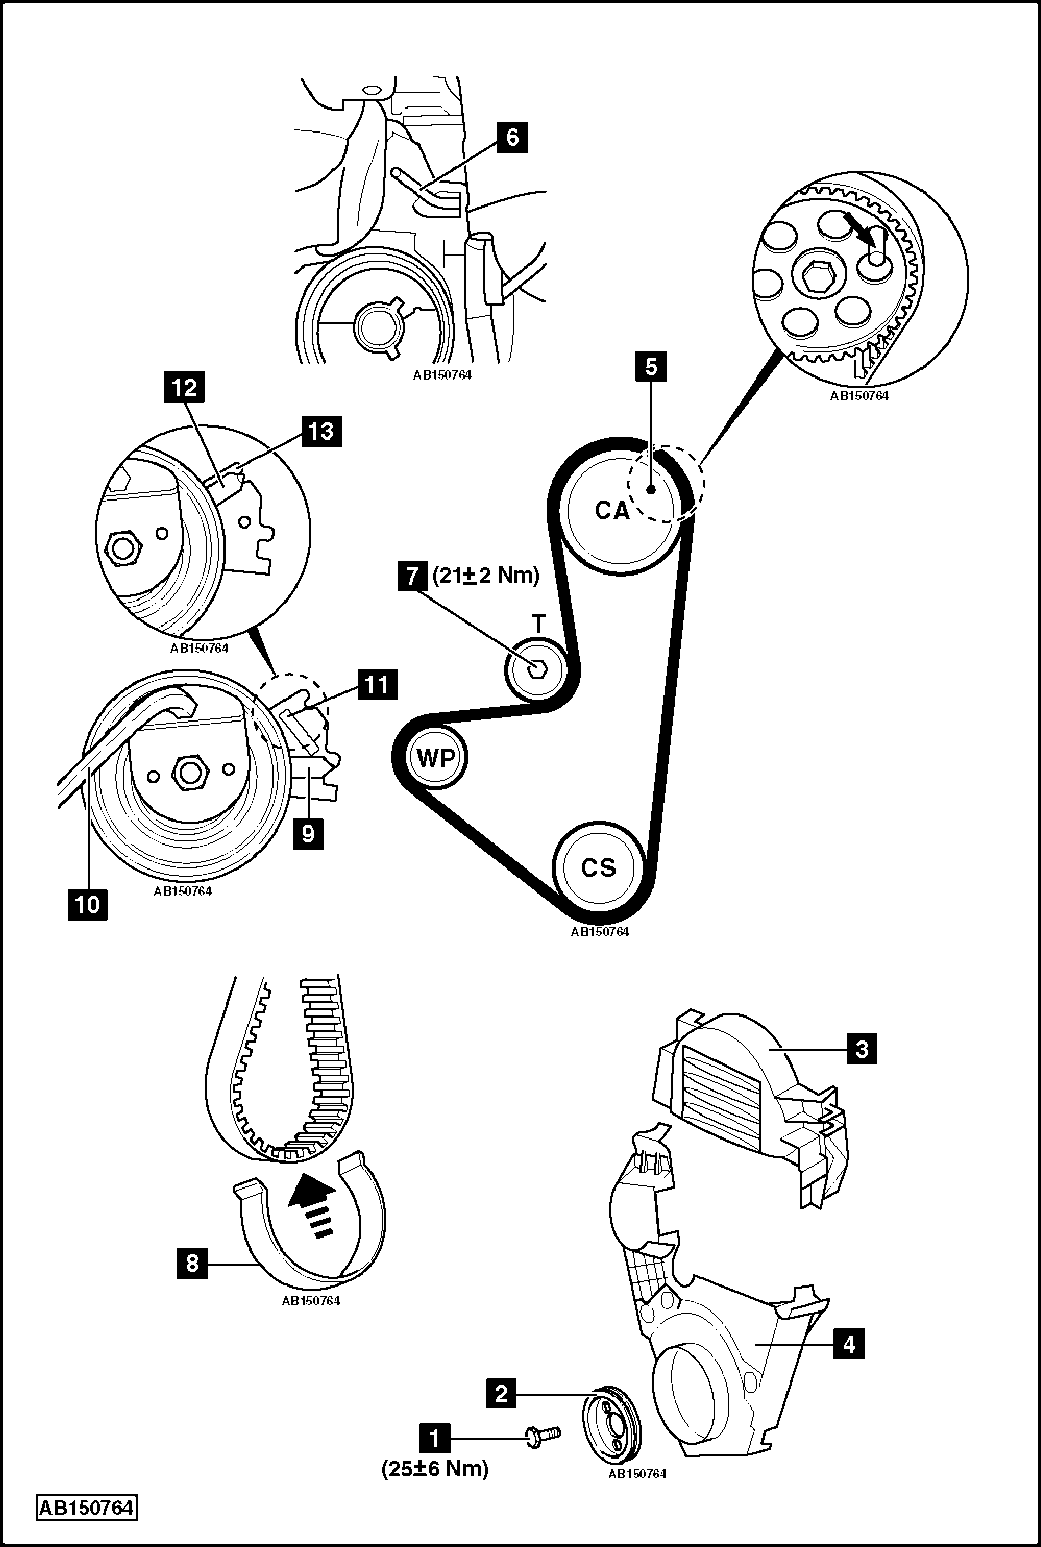
- Crankshaft pulley bolts [1] .
- Crankshaft pulley [2] .
- Oil filter (if necessary).
3. C2/C3/C3 Pluriel: Support engine.
4. Remove:
- C2: Secondary air injection (AIR) pump and bracket.
- Timing belt covers [3] & [4] .
5. Turn crankshaft clockwise to setting position.
6. Insert timing pin in camshaft sprocket [5] . Tool No.4507-T.B or 0132-RZ.
7. Insert flywheel timing pin [6] . Tool No.4507-T.A or 0132-QY.
8. C2/C3/C3 Pluriel: Remove RH engine mounting and bracket.
9. Slacken tensioner pulley nut to release tension on belt [7] .
10. Move tensioner pulley away from belt. Lightly tighten nut [7] .
11. Remove timing belt.
NOTE: DO NOT refit used belt.
Installation
1. Check tensioner pulley and water pump sprocket for smooth operation.
2. Ensure timing pins located correctly [5] & [6] .
3. Fit timing belt to crankshaft sprocket.
4. Secure belt to crankshaft sprocket with retaining clip. Tool No.4533-T.AD or 0153-AE [8] .
5. Fit timing belt in following order:
- Camshaft sprocket.
- Water pump sprocket.
- Tensioner pulley.
NOTE: Ensure belt is taut between sprockets. Ensure arrow on belt faces direction of rotation.
6. Remove:
- Timing pins [5] & [6] .
- Retaining clip [8] .
7. Fit new tensioner pulley nut [7] . Finger tighten.
8. Turn tensioner pulley until pointer at position shown [9] . Use Allen key [10] .
9. Insert tensioner retaining tool [11] . Tool No.4200-T.H or 0153-AL.
10. Temporarily tighten tensioner pulley nut to 10 Nm [7] .
11. C2/C3 I/II/C3 Pluriel: Turn crankshaft four turns clockwise to setting position.
12. C3 III: Turn crankshaft ten turns clockwise to setting position.
NOTE: DO NOT allow crankshaft to turn anti-clockwise.
13. Insert timing pins [5] & [6] .
14. If timing pins cannot be inserted easily, repeat installation procedure.
15. Remove timing pins [5] & [6] .
16. Hold tensioner pulley in position. Use Allen key [10] . Slacken tensioner pulley nut [7] .
17. Remove tensioner retaining tool [11] .
18. Turn tensioner pulley until pointer at position shown [12] . Use Allen key [10] .
19. If pointer passes notch [13] , repeat tensioning procedure.
20. Hold tensioner pulley. Use Allen key [10] . Tighten tensioner pulley nut [7] . Tightening torque: 21 ±2 Nm.
NOTE: Ensure tensioner pulley does not move when tightening nut [7] . If tensioner pulley moves: Repeat tensioning procedure.
21. Install components in reverse order of removal.
22. Tighten crankshaft pulley bolts [1] . Tightening torque: 25±6 Nm.