Skip to content
Special tools
- Camshaft locking tool x 2 – No.EN-46781.
- Camshaft sprocket holding tool – No.KM-6347.
- Camshaft sprocket holding tool handle – No.KM-956-1.
- Crankshaft pulley hub holding tool – No.KM-662-C.
- Crankshaft timing pin – No.EN-46785.
- Timing chain tensioner locking pin – No.KM-955-1.
General precautions
- Disconnect battery earth lead.
- Remove glow plugs to ease turning engine.
- Turn engine in normal direction of rotation (unless otherwise stated).
- Observe tightening torques.
- If fitted: Mark position of crankshaft position (CKP) sensor before removal.
- Do NOT turn crankshaft via camshaft or other sprockets.
- Do NOT turn crankshaft or camshaft with timing chain removed.
 How to replace timing chain on Vauxhall/Opel Astra J 1.3 CDTI ecoFlex
Valve timing procedures
- Removal/installation of timing chain requires:
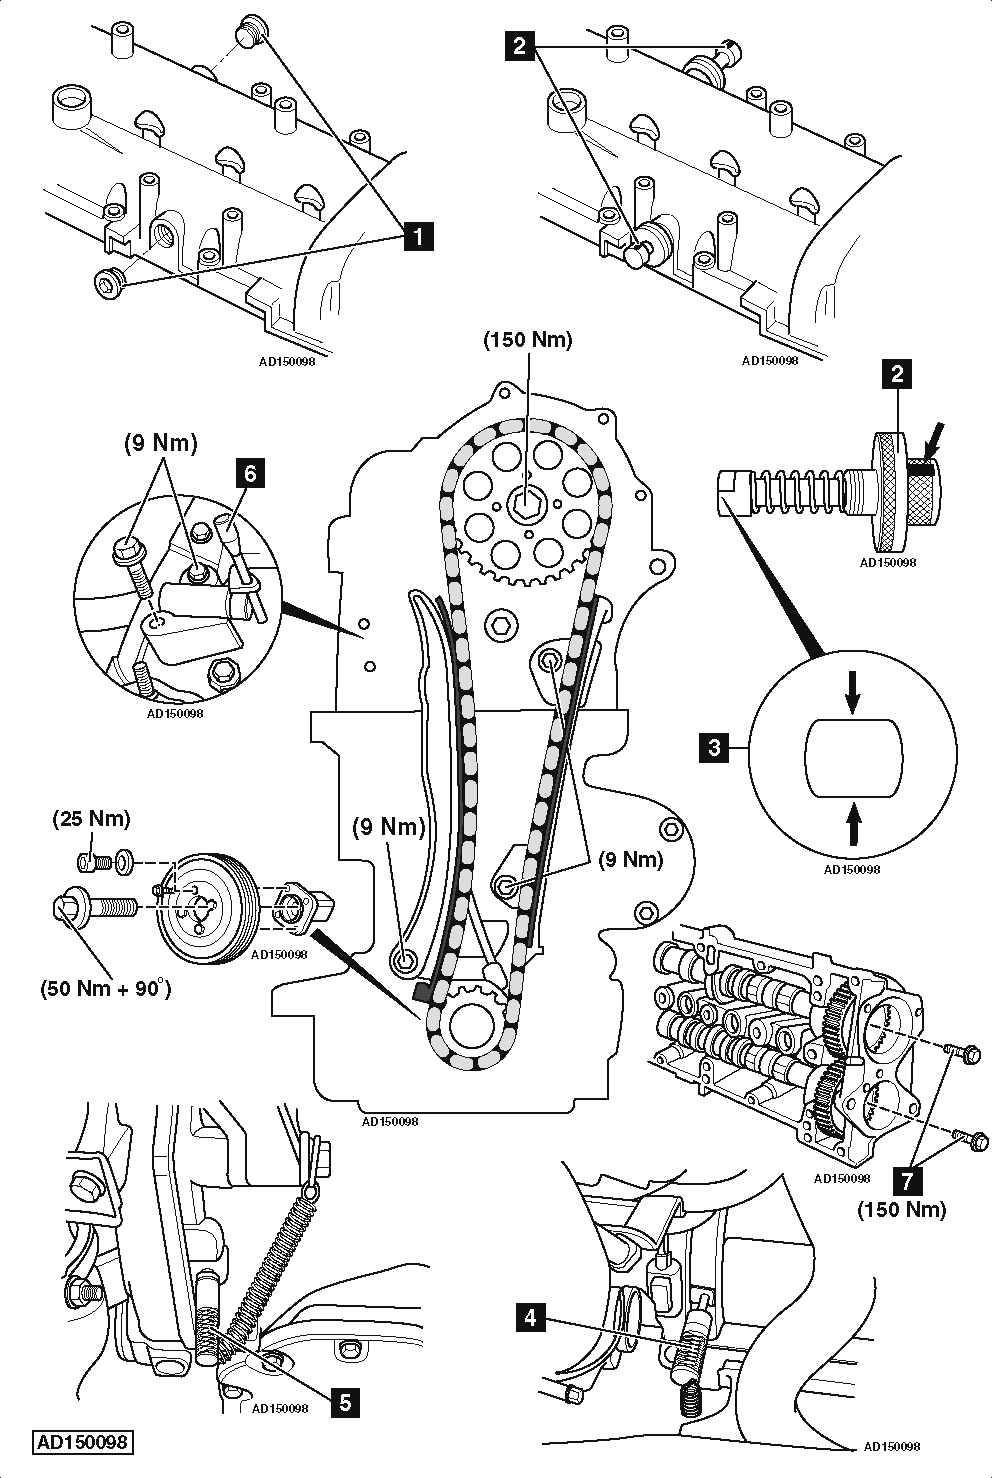
- Remove blanking plugs from camshaft housing [1] .
- Install camshaft locking tools [2] .
- Flat sections on camshaft locking tool must be in horizontal position [3] .
- Turn crankshaft in direction of rotation until both camshaft locking tools engage.
- Install crankshaft timing pin in bell housing hole:
- 5 speed transmission [4] .
- 6 speed transmission [5] .
- Compress timing chain tensioner and lock with timing chain tensioner locking pin [6] .
- Remove timing chain tensioner, tensioner rail and chain guide.
- Remove timing chain, crankshaft sprocket and camshaft sprocket as an assembly.
- Install timing chain, crankshaft sprocket and camshaft sprocket as an assembly.
- Tighten camshaft sprocket bolt to 150 Nm.
- Install timing chain tensioner, tensioner rail and chain guide.
- Remove timing chain tensioner locking pin [6] .
NOTE: Crankshaft damper hub bolt has LH thread. When replacing camshaft sprocket or crankshaft sprocket ensure writing on the sprocket faces outwards.
- Remove camshaft gears as follows:
- Ensure camshaft locking tools correctly fitted [2] .
- Slacken bolt of each camshaft gear [7] .
- Remove camshaft locking tools [2] .
- Remove camshafts and camshaft gears.
- Install camshaft gears as follows:
- Install camshafts and camshaft gears. Finger tighten bolts.
- Install camshaft locking tools [2] .
- Flat sections on camshaft locking tool must be in horizontal position [3] .
- Tighten bolt of each camshaft gear to 150 Nm [7] .
- Install camshaft housing.