Special tools
- Camshaft locking tool – No.KM-6148.
- Crankshaft pulley holder – No.KM-956-1/KM-J-38122-A.
- Tensioner locking tool – No.KM-6077.
General precautions
- Disconnect battery earth lead.
- Remove spark plugs to ease turning engine.
- Turn engine in normal direction of rotation (unless otherwise stated).
- Observe tightening torques.
- If fitted: Mark position of crankshaft position (CKP) sensor before removal.
- Do NOT turn crankshaft via camshaft or other sprockets.
- Do NOT turn crankshaft or camshaft with timing chain removed.
Valve timing procedures
Removal
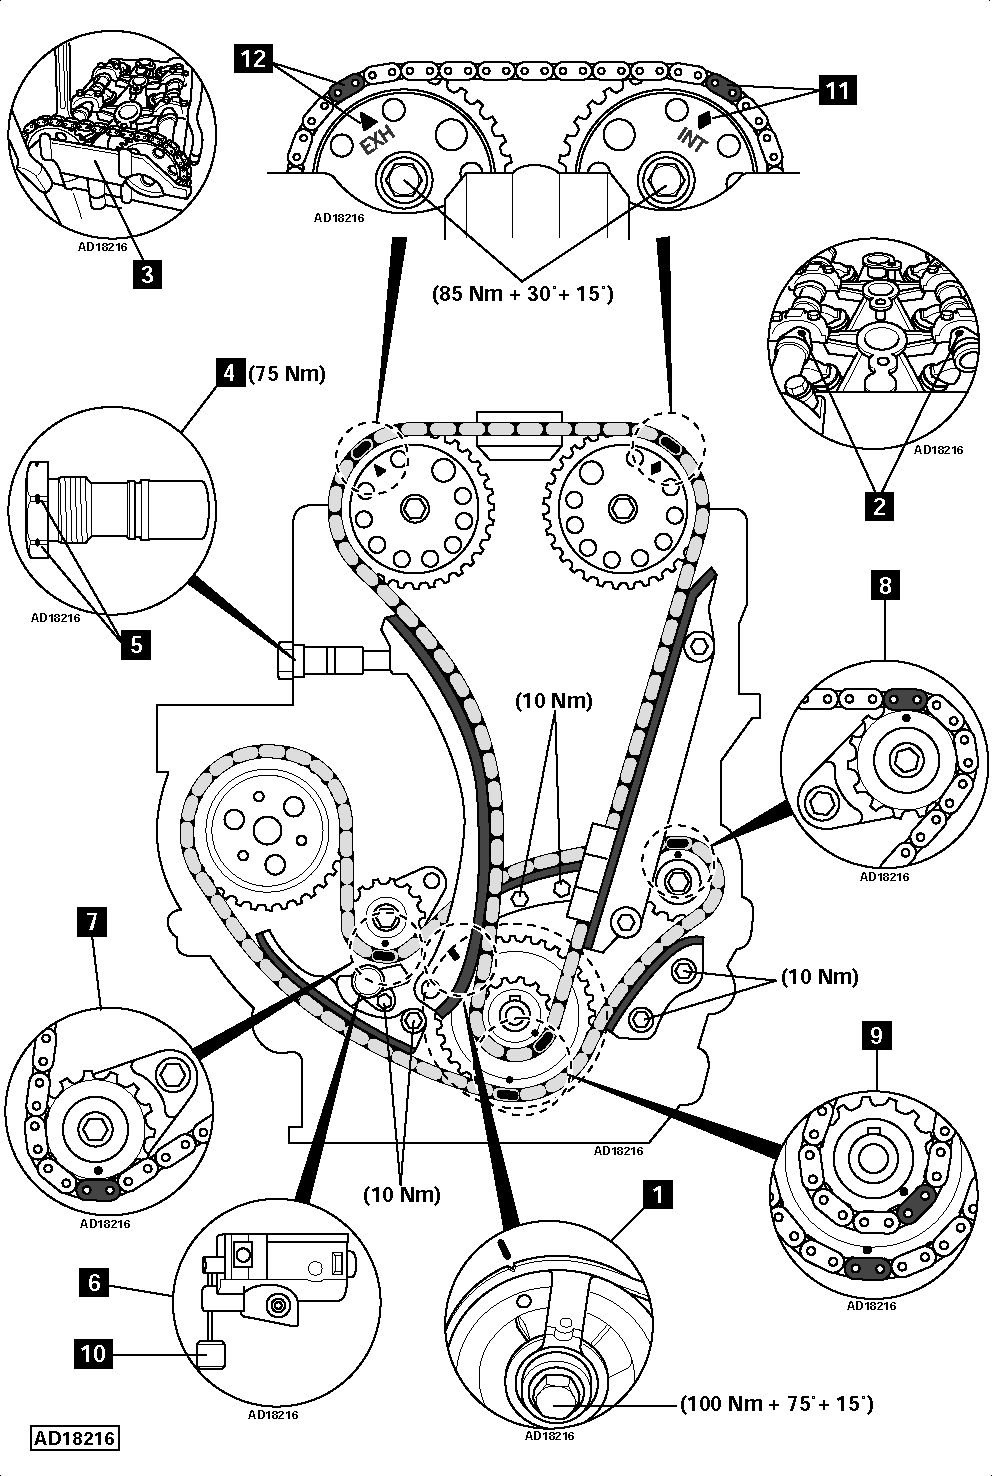
- Ensure crankshaft at TDC on No.4 cylinder [1] & [2] .
- Install camshaft locking tool [3] . Tool No.KM-6148.
- Remove timing chain tensioner [4] .
- Check tensioner for identification marks [5] . If tensioner not marked: Replace tensioner and tensioner rail.
- Remove:
- Camshaft locking tool.
- Exhaust camshaft sprocket.
- Inlet camshaft sprocket complete with timing chain.
- Balancer shaft chain tensioner [6] .
- Tensioner rail and chain guides.
- Balancer shaft chain.
Installation
- Ensure crankshaft at TDC on No.4 cylinder.
- Install balancer shaft chain.
- Align copper coloured chain links with timing mark on each sprocket [7] , [8] & [9] .
- Install timing chain guides and tensioner rail.
- Lock balancer shaft tensioner before installation:
- Turn plunger clockwise.
- Press plunger into tensioner body.
- Insert tensioner locking tool [10] . Tool No.KM-6077.
- Install balancer shaft tensioner [6] .
- Remove tensioner locking tool [10] .
- Install timing chain.
- Install inlet camshaft sprocket.
NOTE: Bolts for camshaft sprockets MUST only be used once.
- Align copper coloured chain link with camshaft sprocket timing mark [11] .
- Install upper timing chain guide.
- Install lower timing chain guide.
- Install exhaust camshaft sprocket.
- Align copper coloured chain link with camshaft sprocket timing mark [12] .
- Ensure copper coloured chain links aligned with timing marks on crankshaft sprockets [9] .
- Install timing chain tensioner rail. Apply Loctite to bolt threads.
- Lock timing chain tensioner before installation:
- Remove tensioner plunger.
- Turn inner plunger clockwise until locks.
- Refit tensioner plunger.
NOTE: Always renew tensioner ‘O’ rings.
- Press tensioner rail briefly against tensioner to unlock tensioner plunger.
- Ensure timing marks aligned [7] , [8] , [9] , [11] & [12] . If not, repeat installation procedures.
- Turn crankshaft two turns clockwise.
- Ensure crankshaft at TDC on No.4 cylinder [1] & [2] .
- Install camshaft locking tool [3] . Tool No.KM-6148.
- Remove camshaft locking tool [3] .
NOTE: Crankshaft pulley bolt MUST only be used once.