Opel Frontera A 2.8 TDI 1995 cambelt change instructionts and replacement inteval. Full guide!
Special tools
- Spring balance
Special precautions
- Disconnect battery earth lead.
- Do NOT turn crankshaft or camshaft when timing belt removed.
- Remove glow plugs to ease turning engine.
- Turn engine in normal direction of rotation (unless otherwise stated).
- Do NOT turn crankshaft via camshaft or other sprockets.
- Observe tightening torques.
- Check diesel injection pump timing after belt replacement.
Repair times – hrs
| Camshaft drive belt/chain – C & A | 1,50 |
| Camshaft drive belt/chain – R & I | 1,90 |
Valve timing procedures
Removal
- Remove:
- Cooling fan.
- Auxiliary drive belt(s).
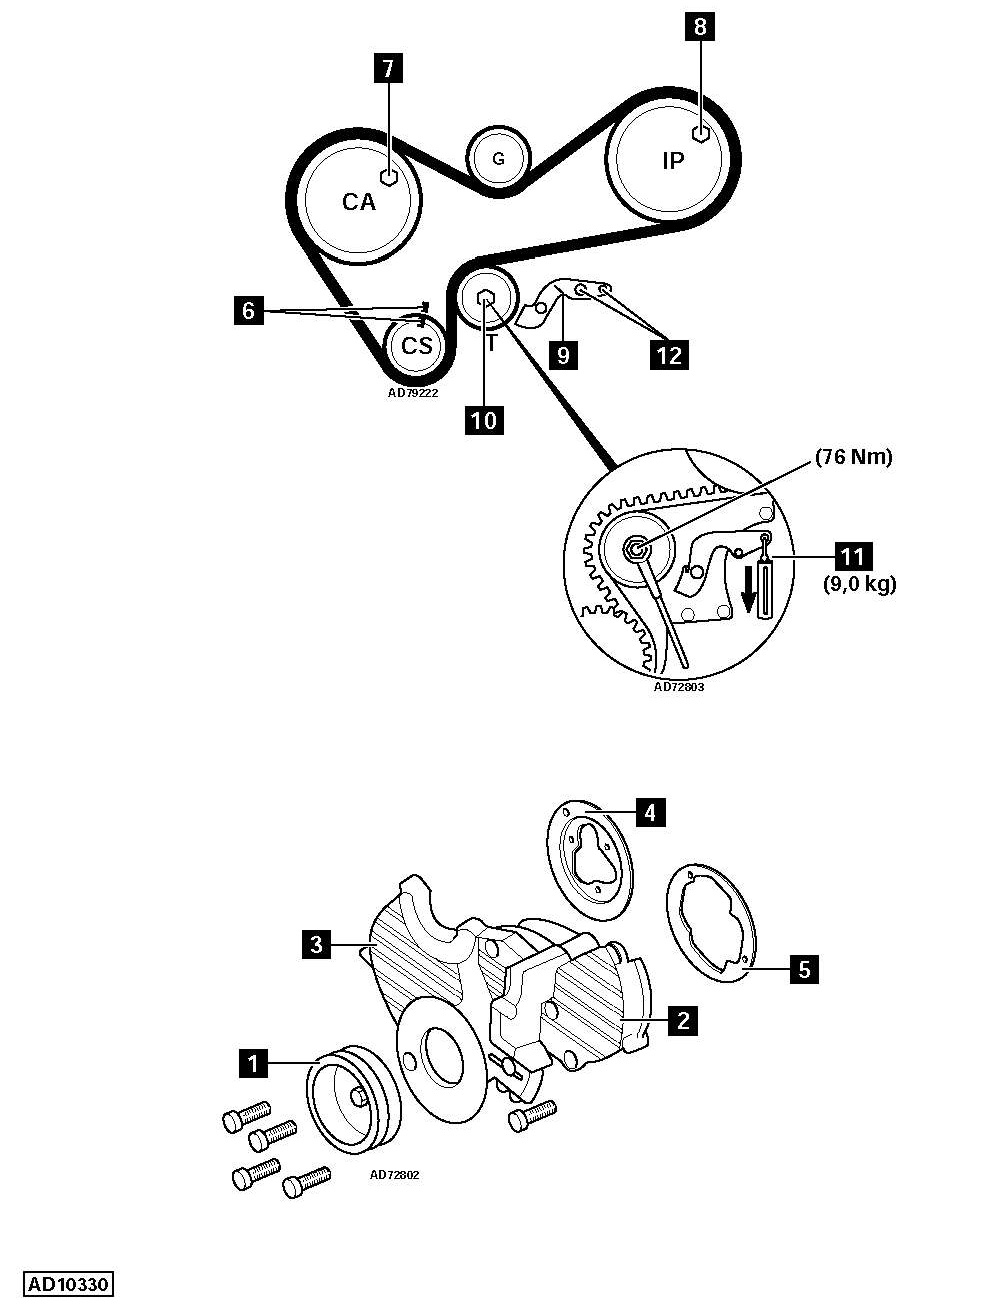
- Crankshaft pulley (4 bolts) [1] .
- Timing belt upper cover [2] .
- Timing belt lower cover [3] .
- Camshaft sprocket flange [4] .
- Injection pump sprocket flange [5] .
- Turn crankshaft clockwise to TDC on 2. No.1 cylinder. Ensure timing marks aligned [6] .
- Screw suitable locking bolts into camshaft and injection pump sprockets [7] & [8] .
- Remove tensioner lever [9] .
- Slacken tensioner bolt [10] . Move tensioner pulley away from belt. Lightly tighten bolt.
- Remove timing belt.
Installation
- Ensure locking bolts located in sprockets [7] & [8] .
- Ensure timing marks aligned [6] .
- Fit timing belt in clockwise direction, starting at crankshaft sprocket.
- Slacken tensioner pulley bolt [10] . Push tensioner pulley against belt. Tighten bolt finger tight.
- Ensure belt is taut between sprockets on non-tensioned side.
- Position tensioner lever [9] against tensioner pulley housing.
- Remove locking bolts from sprockets [7] & [8] .
- Apply a load of 9 kg to tensioner lever [11] . Use spring balance.
- Temporarily tighten tensioner pulley bolt [10] .
- Turn crankshaft 45° anti-clockwise. Slacken tensioner pulley bolt and tighten to 76 Nm [10] .
NOTE: DO NOT turn crankshaft clockwise during tensioning procedure. - Fit tensioner lever to original position [9] . Tighten nuts [12] .
- Install:
- Camshaft sprocket flange [4] .
- Injection pump sprocket flange [5] .
- Install components in reverse order of removal.