Honda Accord 2.2 1993-98 cambelt change instructions and replacement inteval. Full guide!
Special tools
- Balancer shaft locking pin – Honda No.07LAG-PT20100.
- Crankshaft pulley holding tool – Honda Nos.07JAB-0010200 & 07MAB-PY30100.
Special precautions
- Disconnect battery earth lead.
- DO NOT turn crankshaft or camshaft when timing belt removed.
- Remove spark plugs to ease turning engine.
- Turn engine in normal direction of rotation (unless otherwise stated).
- DO NOT turn engine via camshaft or other sprockets.
- Observe all tightening torques.
Repair times – hrs
| Camshaft drive belt/chain – R & I | 2,30 |
Valve timing procedures

Removal
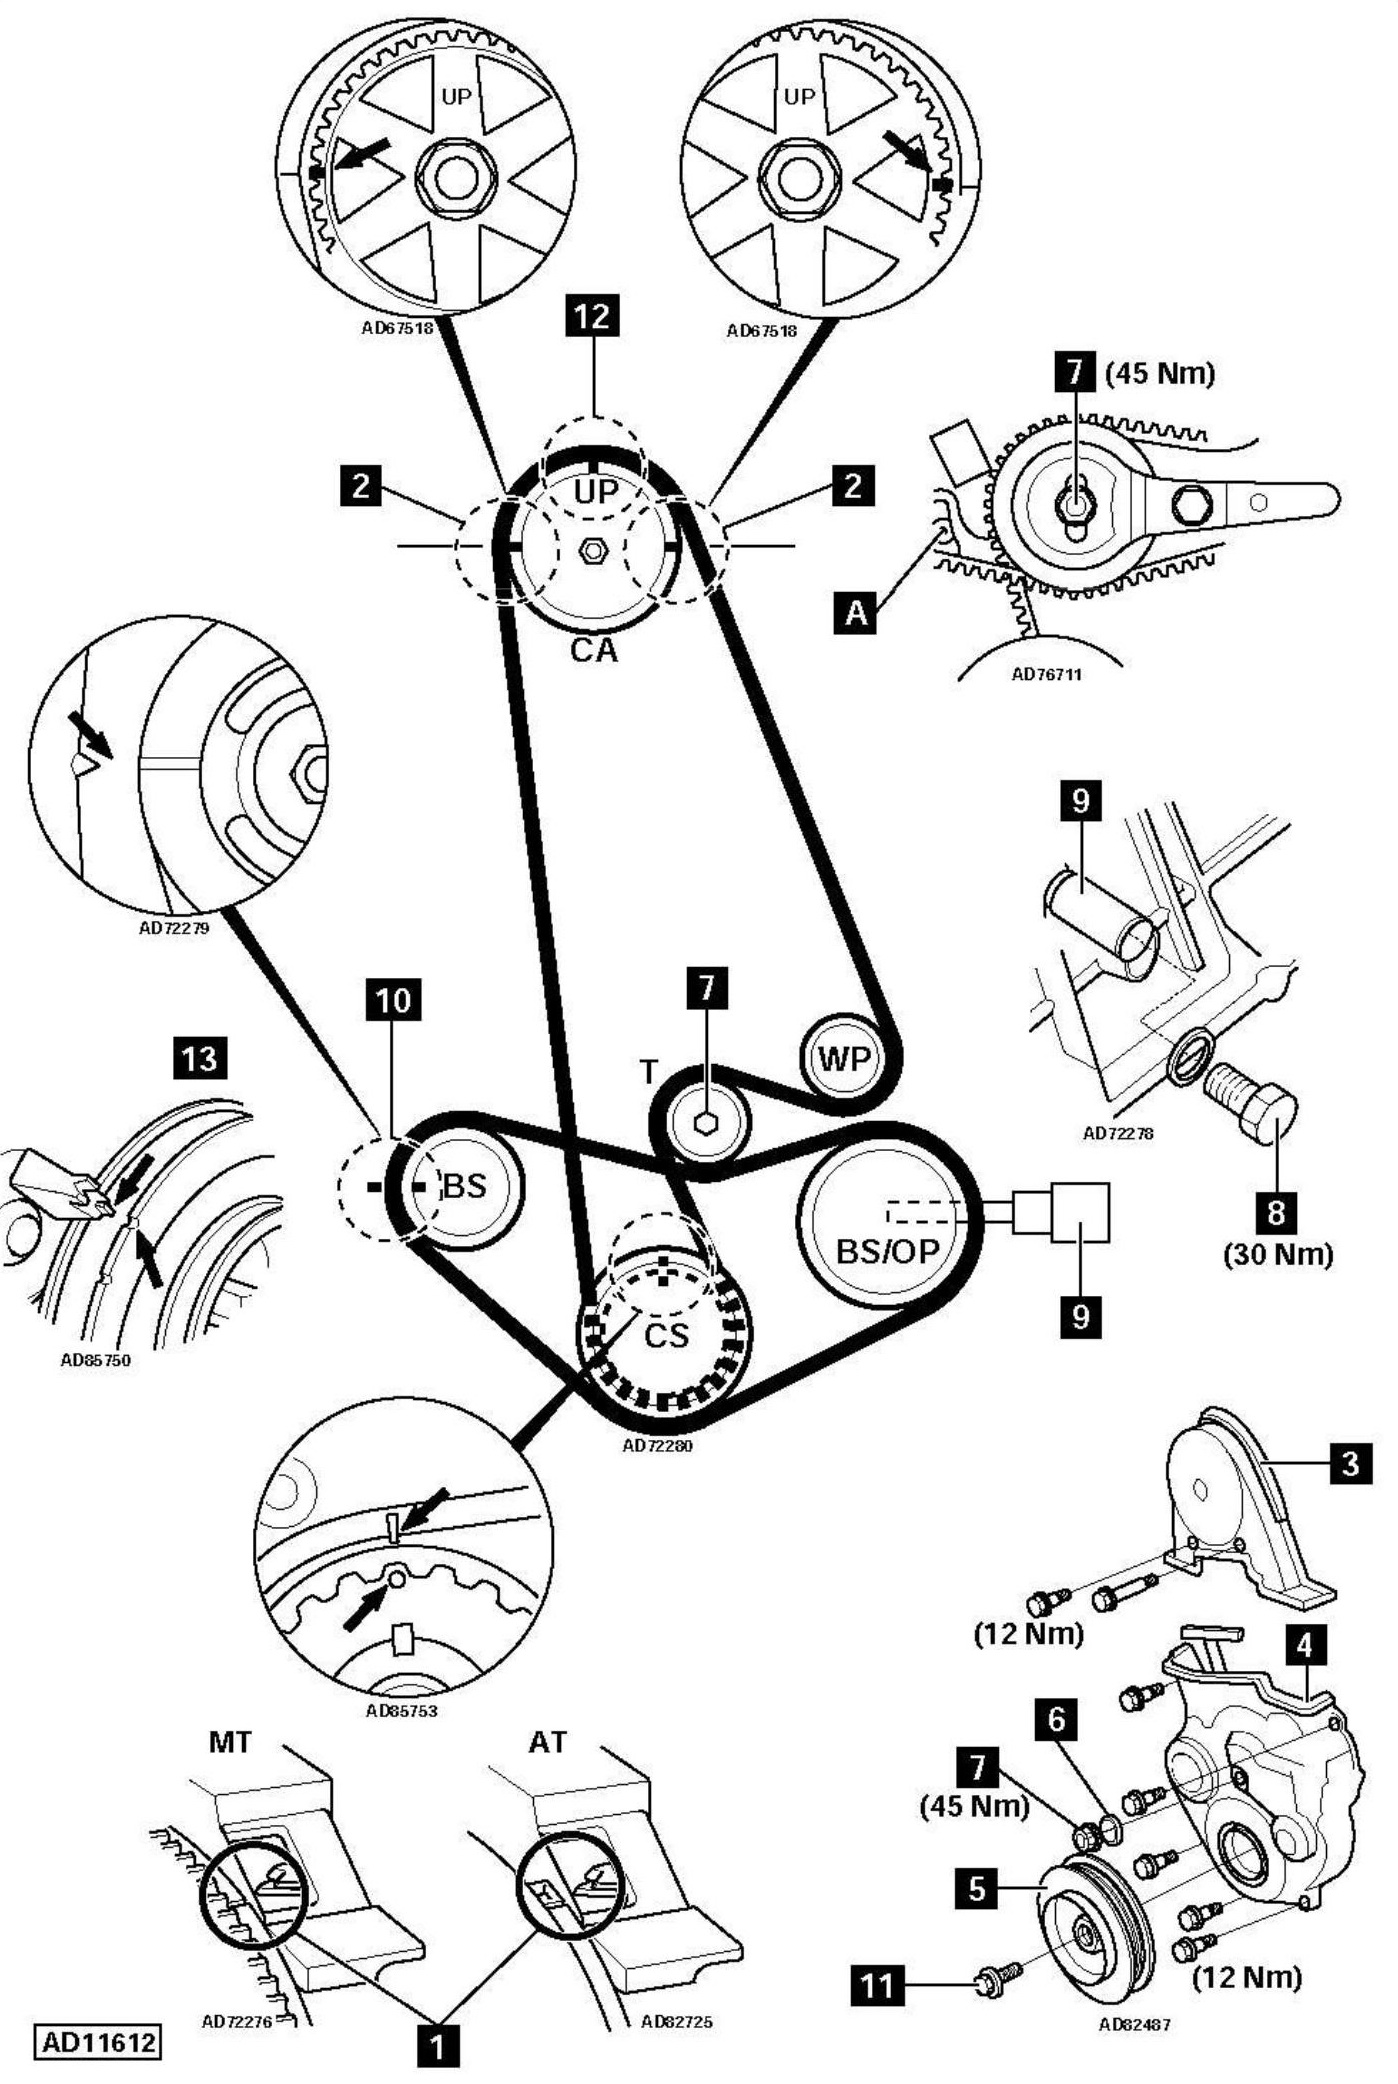
NOTE: Normal direction of crankshaft rotation is anti-clockwise. Balancer shaft belt must be removed before removing timing belt.
- Support engine.
- Remove:
- Lower splash guard.
- Auxiliary drive belts.
- PAS pump. DO NOT disconnect hoses.
- Cylinder head cover.
- Timing belt upper cover [3] .
- LH engine mounting.
- Dipstick and tube.
- Rubber seal for adjusting nut [6] . DO NOT slacken nut.
- Crankshaft pulley [5] . Use tool Nos.07JAB-0010200 & 07MAB-PY30100.
- Timing belt lower cover [4] .
- Temporarily fit crankshaft pulley. Turn crankshaft to TDC on No.1 cylinder. Ensure white flywheel timing mark and camshaft timing marks aligned [1] & [2] . Ensure ‘UP’ mark on camshaft sprocket at top [12] .
NOTE: F22Z2 engines have TDC marks on crankshaft pulley and timing belt lower cover [13] . - Fit 6 mm bolt at [A] to lock tensioner arm.
- Slacken tensioner nut [7] . Move tensioner away from belt. Lightly tighten nut.
- Remove balancer shaft belt.
- Slacken 6 mm bolt [A] . Slacken tensioner nut [7] . Move tensioner away from belt and lightly tighten nut.
- Remove:
- Crankshaft pulley [5] .
- Timing belt.
Installation
- Ensure timing marks aligned [1], [2] & [13] .
- Fit timing belt in anti-clockwise direction, starting at crankshaft sprocket. Ensure belt is taut between sprockets.
- Ensure 6 mm bolt is slack [A] .
- Slacken tensioner nut and tighten to 45 Nm [7] .
- Temporarily fit crankshaft pulley. Turn crankshaft slowly six turns anti-clockwise to settle belt. Ensure timing marks aligned.
- Turn crankshaft slowly anti-clockwise until three teeth of camshaft sprocket have passed timing marks [2] .
- Slacken tensioner nut and tighten to 45 Nm [7] .
- Turn crankshaft to TDC on No.1 cylinder. Ensure timing marks aligned.
- Tighten 6 mm bolt [A] to lock tensioner arm.
- Remove blanking plug [8] . Insert balancer shaft locking pin. Tool No.07LAG-PT20100 [9] . Turn rear balancer shaft sprocket until locking pin locates in hole in shaft.
- Align front balancer shaft timing marks [10] .
- Remove crankshaft pulley [5] .
- Fit balancer shaft belt.
- Slacken tensioner nut [7] .
- Remove balancer shaft locking pin [9] . Fit blanking plug and tighten to 30 Nm.
- Fit crankshaft pulley [5] . Turn crankshaft one turn anti-clockwise.
- Tighten tensioner nut [7] . Tightening torque: 45 Nm.
- Remove 6 mm bolt [A] .
- Install components in reverse order of removal.
- Tighten crankshaft pulley bolt [11] . Tightening torque: F18A3/F20Z1/2/3: 220 Nm. Except F18A3/F20Z1/2/3: 245-250 Nm.