Honda Prelude 2.2 2001 cambelt change instructions and replacement inteval. Full guide!
Special tools
- Balancer shaft locking pin – Honda No.07LAG-PT20100.
- Clamp – Honda No.14540-P13-003.
Special precautions
- Disconnect battery earth lead.
- DO NOT turn crankshaft or camshaft when timing belt removed.
- Remove spark plugs to ease turning engine.
- Turn engine in normal direction of rotation (unless otherwise stated).
- DO NOT turn engine via camshaft or other sprockets.
- Observe all tightening torques.
Repair times – hrs
| Camshaft drive belt/chain – R & I | 2,40 |
Valve timing procedures
Removal
NOTE: Normal direction of crankshaft rotation is anti-clockwise. Balancer shaft belt must be removed before removing timing belt.
- Raise and support front of vehicle.
- Support engine.
- Remove:
- LH front wheel.
- LH inner wing panel.
- Engine undershield.
- Cruise control actuator. DO NOT disconnect control cable.
- Auxiliary drive belts.
- Cylinder head cover.
- Wiring harness.
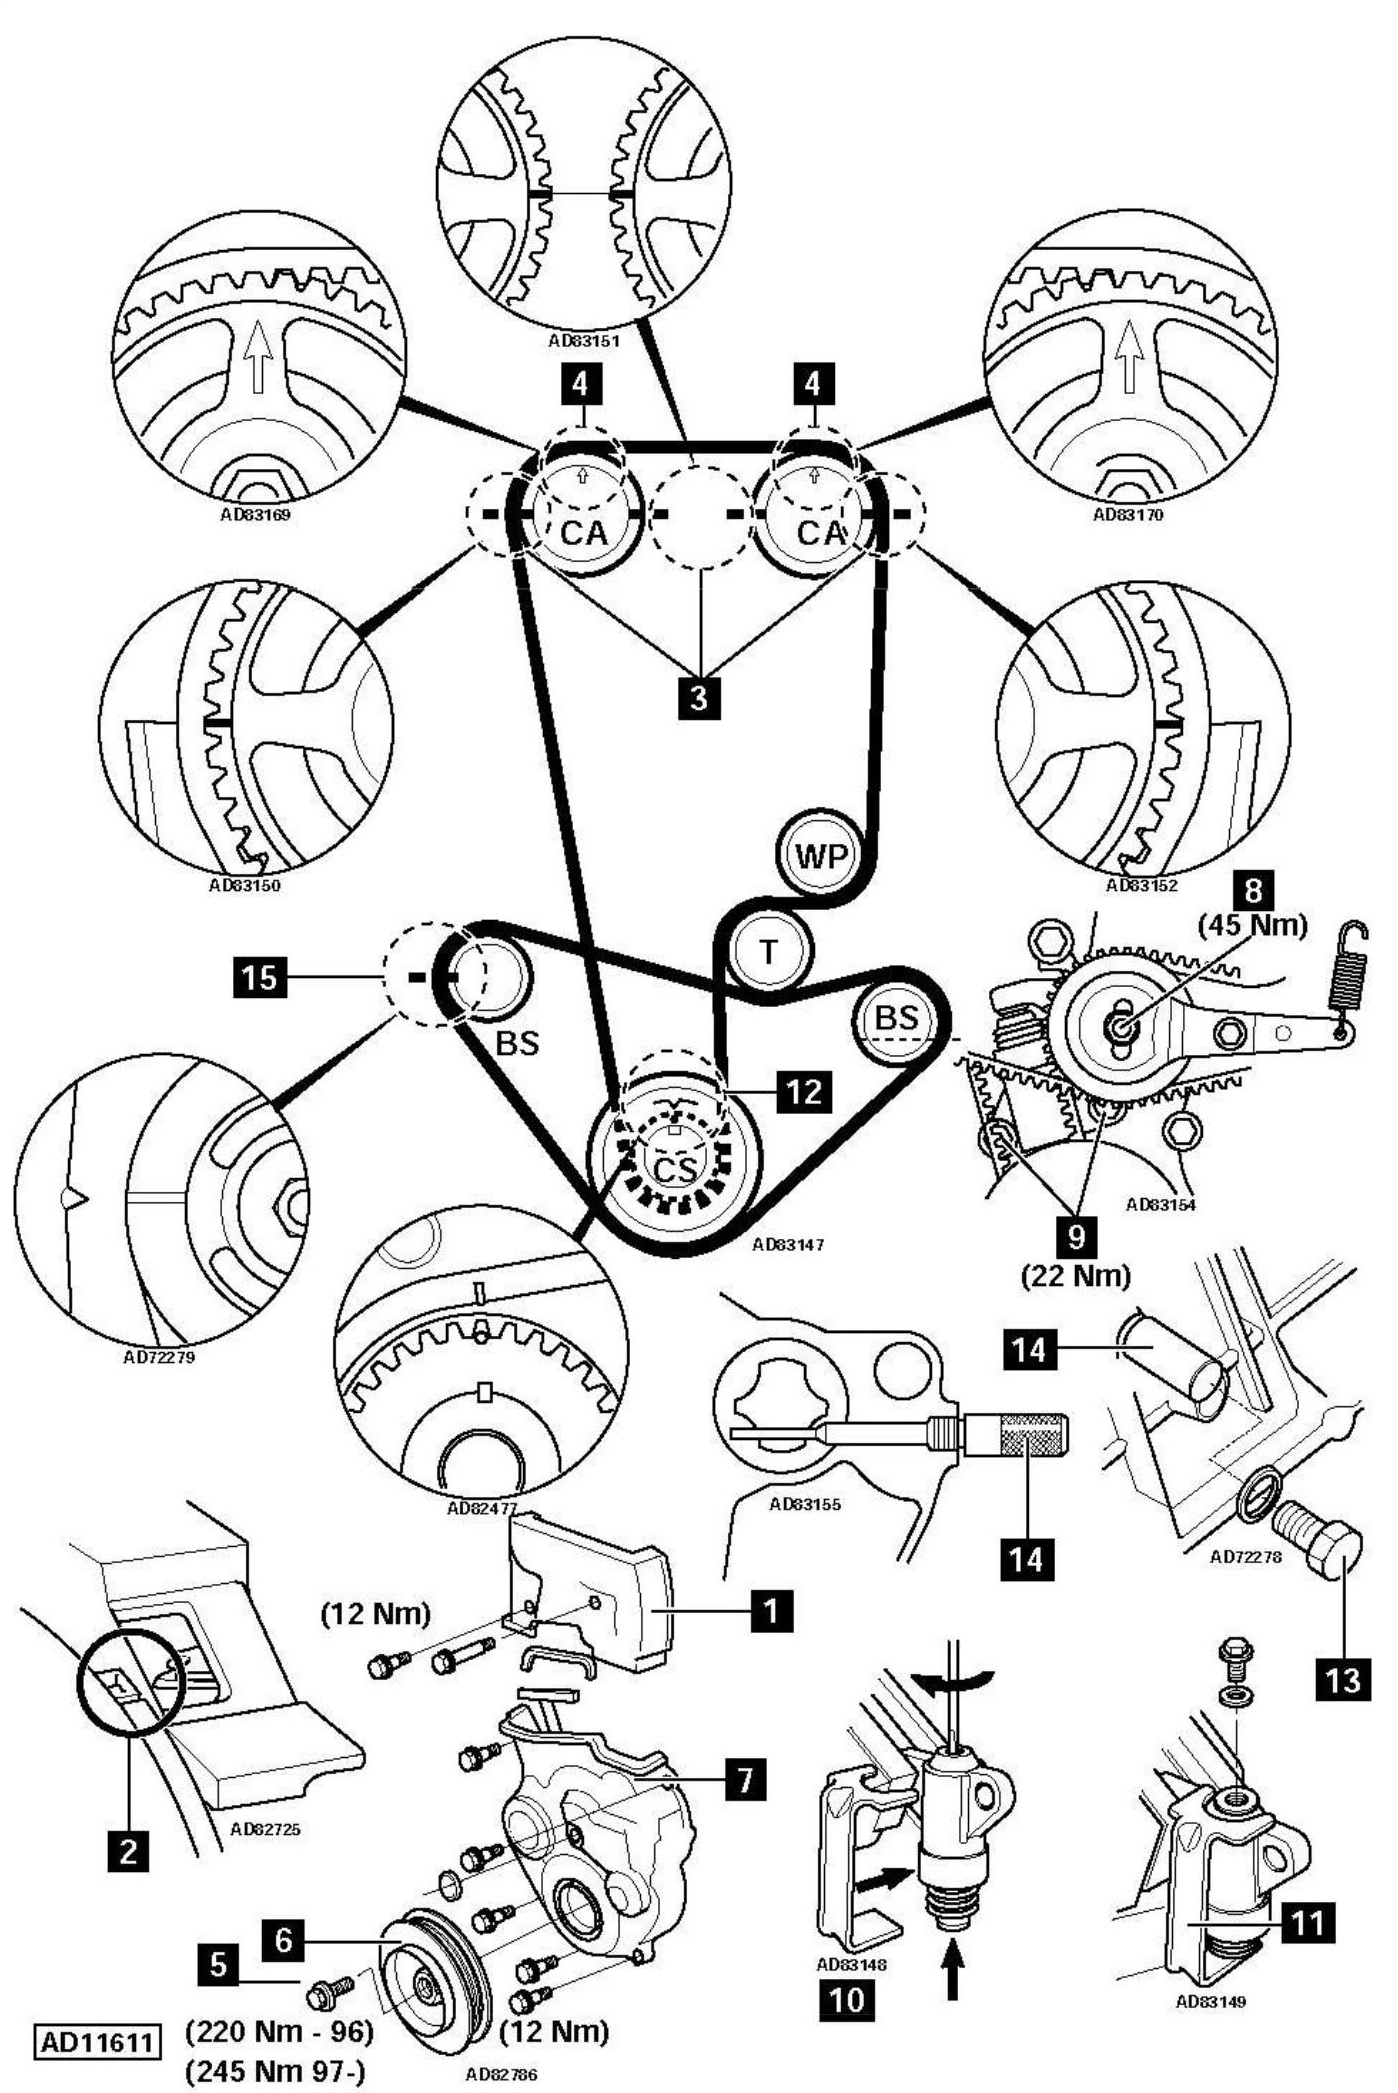
- Timing belt upper cover [1] .
- Dipstick and tube.
- LH engine mounting.
- Turn crankshaft anti-clockwise to TDC on No.1 cylinder. Ensure flywheel timing marks aligned [2] .
- Ensure timing marks on camshaft sprockets aligned with upper cylinder head face [3] . Ensure arrows point upwards [4] .
- Remove:
- Crankshaft pulley bolt and washer [5] .
- Crankshaft pulley [6] .
- Timing belt lower cover [7] .
- Crankshaft position (CKP) sensor (if fitted).
- Slacken tensioner nut [8] . Move tensioner away from belts. Lightly tighten nut.
- Remove:
- Balancer shaft belt.
- Timing belt.
- Automatic tensioner unit bolts [9] .
- Automatic tensioner unit.
- Check tensioner body for leakage or damage.
Installation
- Retract automatic tensioner as follows:
- Invert automatic tensioner unit and clamp boss in vice [10] .
- Remove blanking plug.
- Insert screwdriver. Turn clockwise until pushrod fully retracted.
- Fit clamp to keep pushrod retracted [11] . Tool No.14540-P13-003.
- Fit blanking plug. Use new washer.
- Ensure crankshaft sprocket timing marks aligned [12] .
- Ensure timing marks on camshaft sprockets aligned with upper cylinder head face [3] . Ensure arrows point upwards [4] .
- Fit timing belt in following order:
- Crankshaft sprocket.
- Exhaust camshaft sprocket.
- Inlet camshaft sprocket.
- Water pump sprocket.
- Tensioner pulley.
- Ensure belt is taut between sprockets on non-tensioned side.
- Install automatic tensioner unit. Tighten bolts to 22 Nm [9] .
- Remove clamp from automatic tensioner unit. Tool No.14540-P13-003.
- Remove blanking plug [13] . Insert balancer shaft locking pin [14] . Tool No.07LAG-PT20100.
- Turn rear balancer shaft sprocket until locking pin locates in hole in shaft.
- Align front balancer shaft timing marks [15] .
- Fit balancer shaft belt.
- Slacken tensioner nut [8] . Ensure tensioner free to move.
- Remove locking pin [14] . Turn crankshaft one turn anti-clockwise.
- Tighten tensioner nut [8] . Tightening torque: 45 Nm.
- Install components in reverse order of removal.
- Lightly oil threads but NOT contact face of crankshaft pulley bolt [5] .
- Tighten crankshaft pulley bolt [5] . Tightening torque:1996: 220 Nm. 1997: 245 Nm.