Audi A6 quattro 3.0D TDi 2005 cambelt change instructions and replacement inteval. Full guide!
Special tools
- Camshaft sprocket holding tool – No.3036.
- Camshaft sprocket puller – No.3032.
- Crankshaft turning tool – No.T40058.
Special precautions
- Disconnect battery earth lead.
- DO NOT turn crankshaft or camshaft when timing belt removed.
- Remove glow plugs to ease turning engine.
- Turn engine in normal direction of rotation (unless otherwise stated).
- DO NOT turn engine via camshaft or other sprockets.
- Observe all tightening torques.
Repair times – hrs
| Camshaft drive belt/chain – R & I | 15,00 |
| Camshaft drive belt/chain, AT – R & I | 13,10 |
| Camshaft drive belt/chain (rear) – R & I | 13,10 |
| Injection pump drive belt/chain – R & I | 1,60 |
Valve timing procedures

Removal
NOTE: The high-pressure fuel pump fitted to this engine does not require timing.
- Raise and support front of vehicle.
- Remove:
- Engine top cover.
- Air intake pipes to inlet manifolds.
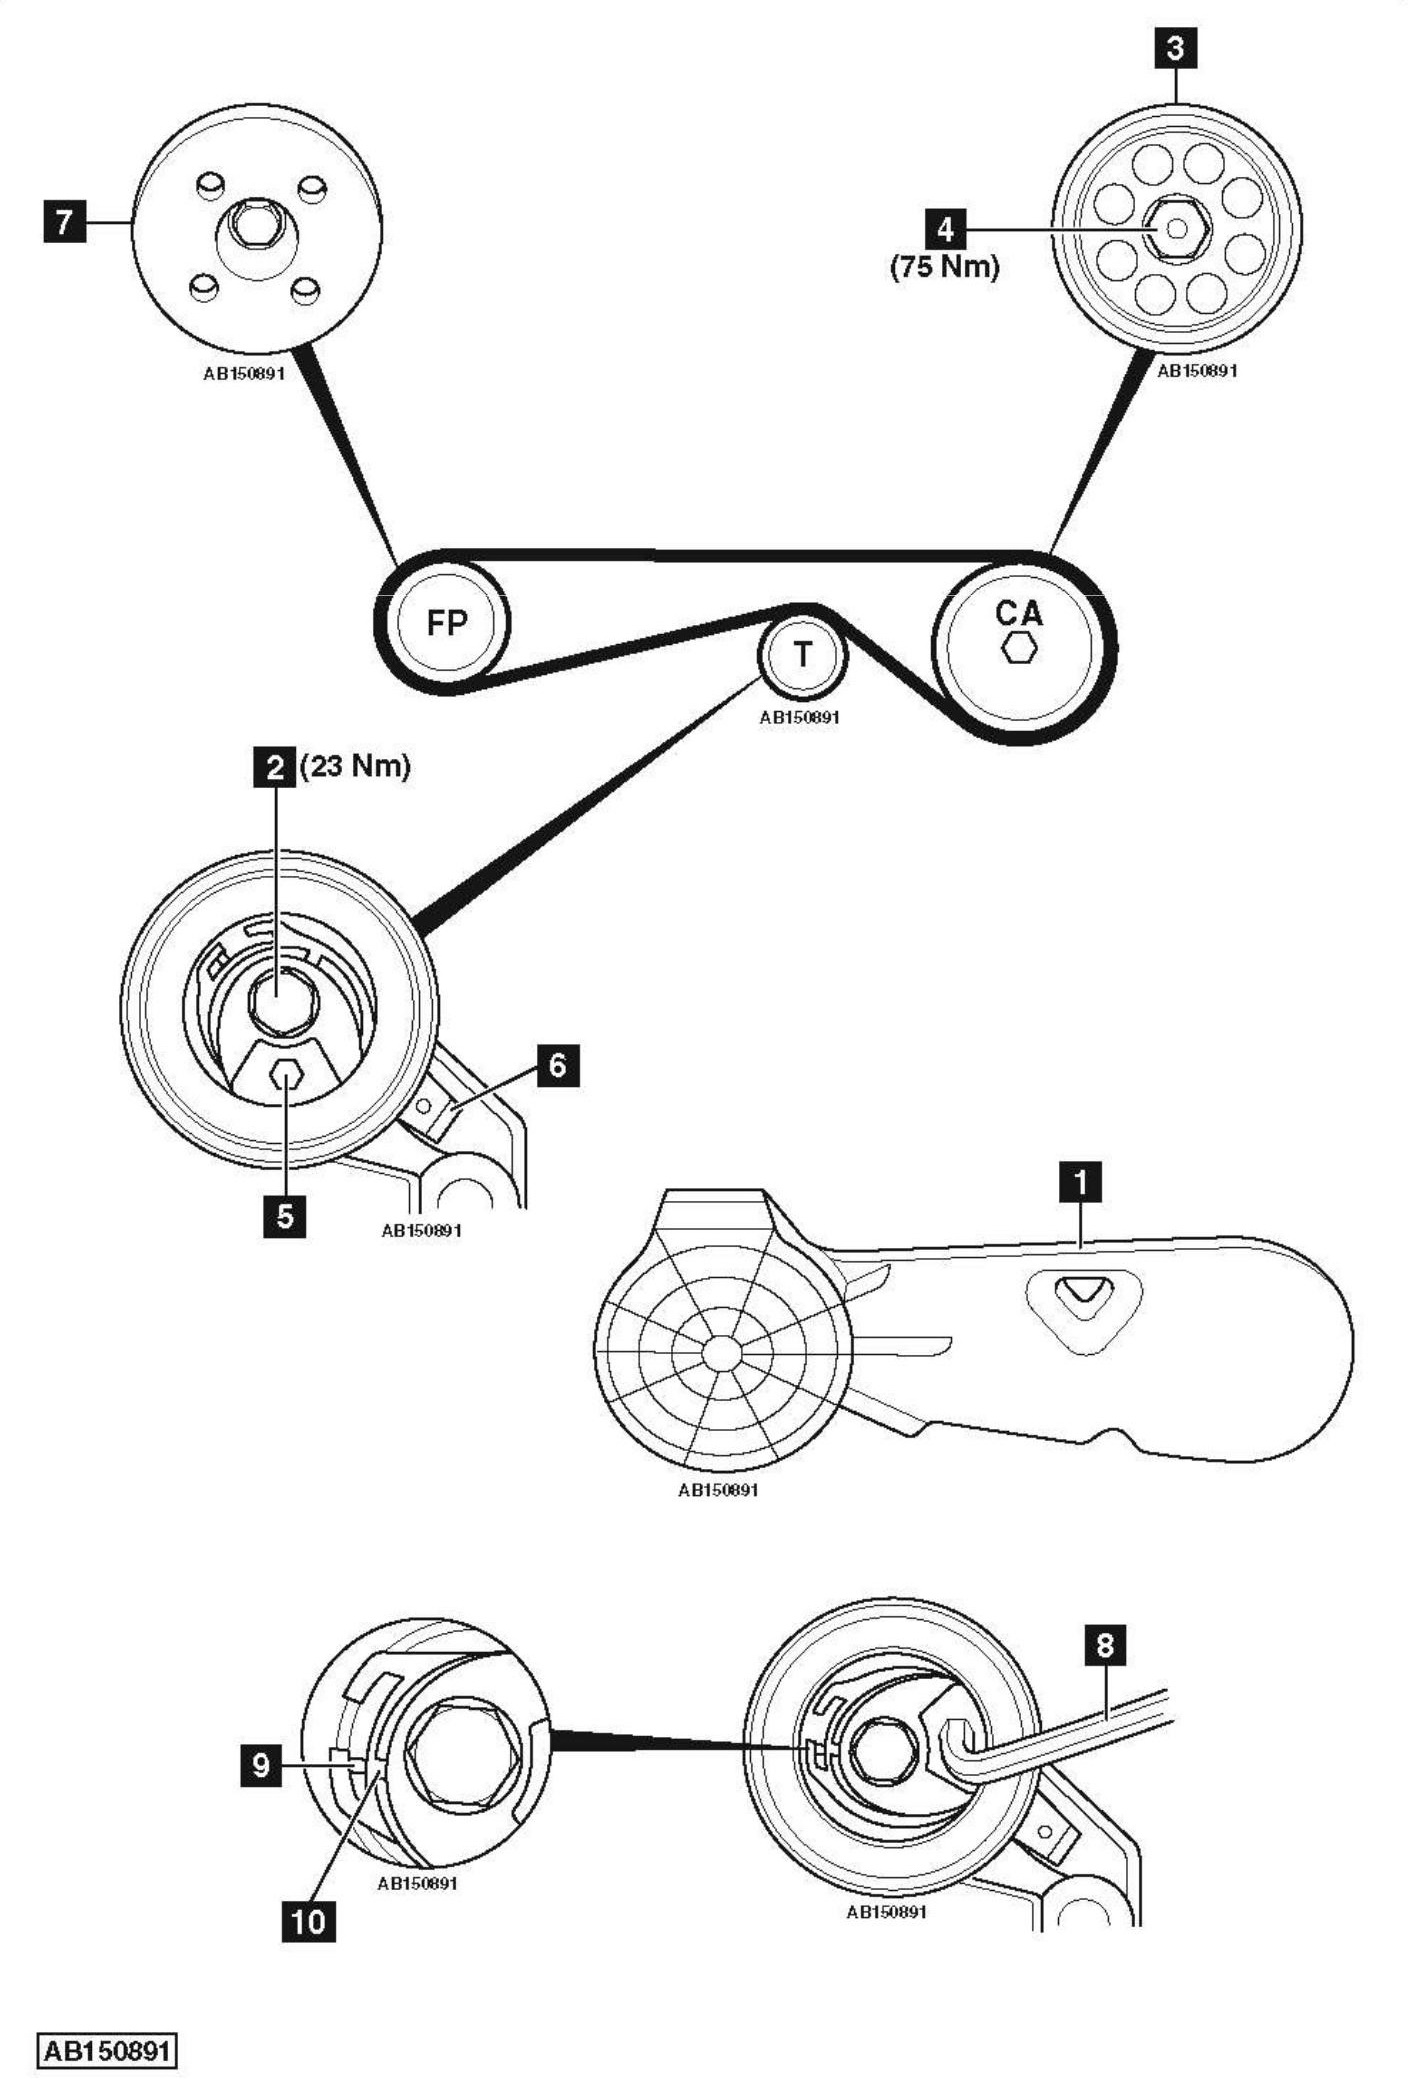
- High-pressure fuel pump belt cover [1] .
- Slacken tensioner pulley bolt two turns [2] .
- Move tensioner pulley away from belt.
- Hold camshaft sprocket [3] . Use tool No.3036.
- Slacken camshaft sprocket bolt two turns [4] .
- Loosen camshaft sprocket from taper [3] . Use tool No.3032.
- Remove:
- Camshaft sprocket puller.
- Camshaft sprocket bolt [4] .
- Camshaft sprocket together with high-pressure fuel pump belt [3] .
NOTE: Mark direction of rotation on belt with chalk if belt is to be reused.
Installation
NOTE: If reusing old belt, observe direction of rotation marks on belt.
-
- Ensure tensioner pulley hexagon at 6 o’clock position [5] .
- Ensure tensioner pulley retaining lug is properly engaged [6] .
- Lightly tighten tensioner pulley bolt [2] .
- Fit belt to high-pressure fuel pump sprocket [7] .
- Fit camshaft sprocket together with high-pressure fuel pump belt [3] .
- Fit camshaft sprocket bolt [4] .
- Ensure belt is taut on non-tensioned side.
- Tighten camshaft sprocket bolt finger tight [4] .
- Slacken tensioner pulley bolt [2] .
- Turn tensioner pulley anti-clockwise until hexagon at 1 o’clock position, then clockwise until hexagon at 3 o’clock position. Use Allen key [8] .
NOTE: DO NOT allow hexagon to move up to or beyond 12 o’clock position. - Turn tensioner pulley anti-clockwise until pointer aligned with notch [9] & [10] . Use Allen key [8] .
- Hold tensioner pulley in position. Use Allen key [8] .
- Tighten tensioner pulley bolt [2] . Tightening torque: 23 Nm.
- Hold camshaft sprocket [3] . Use tool No.3036.
- Tighten camshaft sprocket bolt [4] . Tightening torque: 75 Nm.
- Turn crankshaft one turn clockwise. Use tool No.T40058.
- Ensure tensioner pulley pointer and notch aligned [9] & [10] . If not: Repeat tensioning procedure.
- Fit high-pressure fuel pump belt cover [1] .
- Install components in reverse order of removal.