Special tools
- Camshaft sprocket locking tool – adapter – No.303-576.
- Camshaft sprocket alignment tool – No.303-597-01.
- Camshaft alignment tool – No.303-1146.
- Camshaft chain tensioning tool – No.303-571.
- Crankshaft locking tool – No.303-674.
- Crankshaft pulley locking tool – No.303-573.
- Crankshaft pulley installer – No.303-102.
- Crankshaft pulley removal tool – No.303-1049.
- Intermediate shaft rear sprocket holding tool – No.303-634.
General precautions
- Disconnect battery earth lead.
- Remove spark plugs to ease turning engine.
- Turn engine in normal direction of rotation (unless otherwise stated).
- Observe tightening torques.
- If fitted: Mark position of crankshaft position (CKP) sensor before removal.
- Do NOT turn crankshaft via camshaft or other sprockets.
- Do NOT turn crankshaft or camshaft with timing chain removed.
Valve timing procedures
Removal
- Removal/installation of timing chain(s) requires:
- Gearbox removal.
- Cylinder head removal.
NOTE: Camshaft timing can be checked and adjusted in situ.
- Engine at TDC No.1 cylinder.
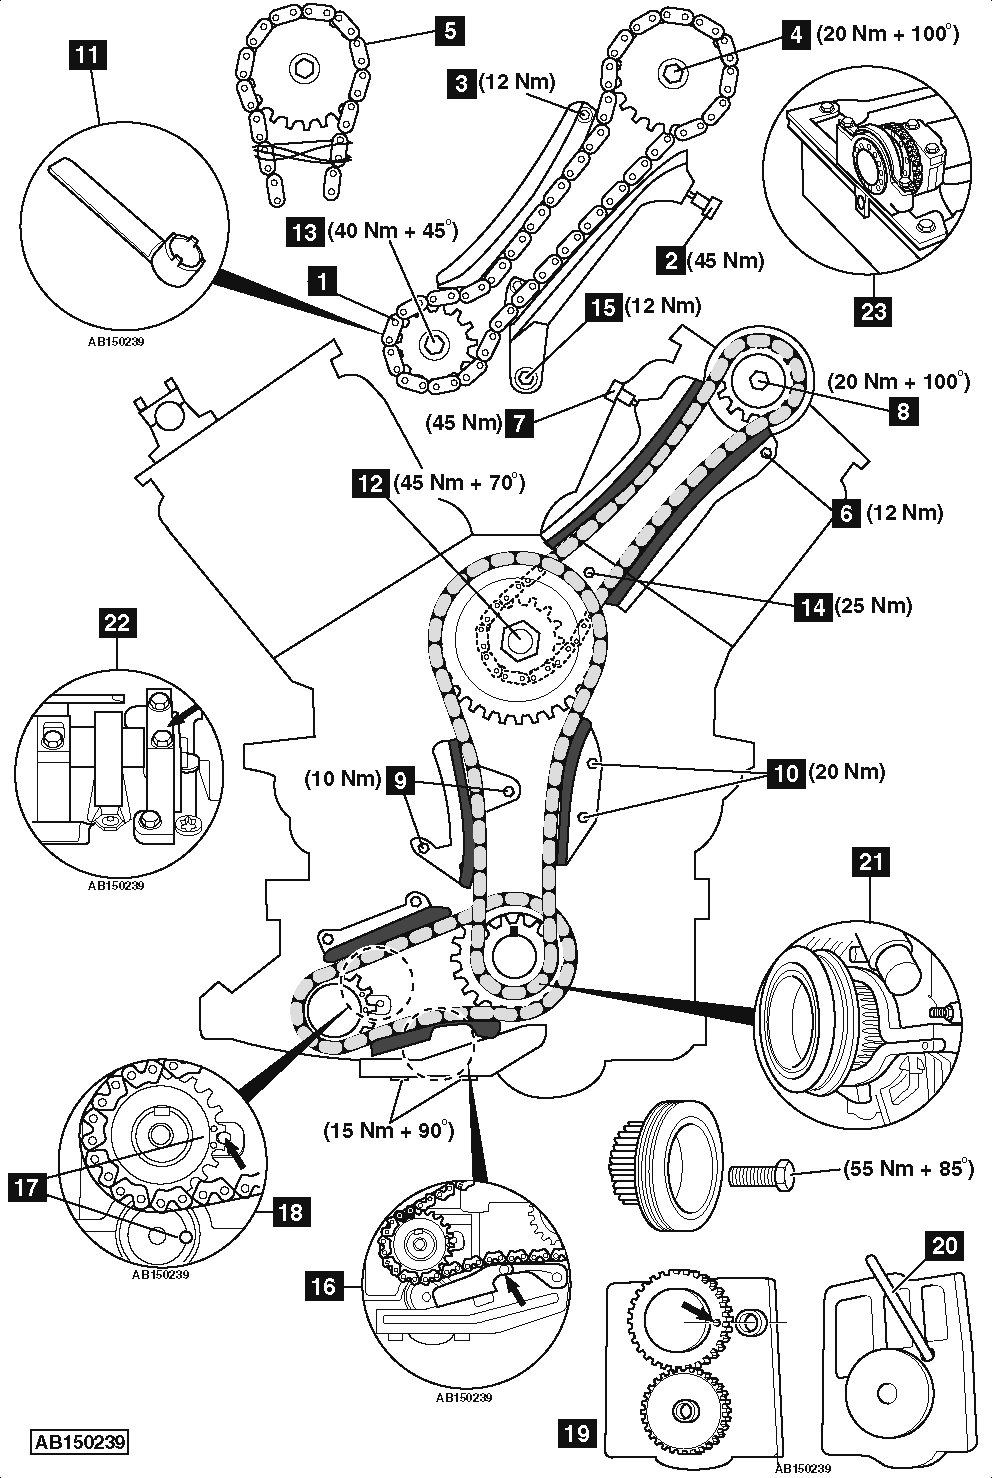
NOTE: RH camshaft is driven by secondary timing chain at rear of engine [1] .
- Remove RH secondary timing chain tensioner [2] .
- Remove RH secondary timing chain cassette bolt [3] .
- Remove RH camshaft sprocket bolt [4] .
NOTE: RH camshaft sprocket bolt has LH thread.
- Secure secondary timing chain to camshaft sprocket [5] .
- Remove LH secondary timing chain cassette bolt [6] .
- Remove LH secondary timing chain tensioner [7] .
- Remove LH camshaft sprocket bolt [8] .
- Secure secondary timing chain to camshaft sprocket [5] .
- Remove cylinder heads.
- Remove timing cover.
- Remove primary timing chain tensioner [9] .
- Remove primary timing chain guide [10] .
- Remove access plug from rear of cylinder block.
- Install intermediate shaft rear sprocket holding tool [11] . Tool No.303-634.
- Remove bolt, intermediate shaft front sprocket and primary chain [12] .
- Remove intermediate shaft rear sprocket bolt [13] .
- Remove bolt and LH secondary timing chain cassette [14] .
- Remove bolt and RH secondary timing chain cassette [15] .
- Lock balancer shaft chain tensioner with pin before removal [16] .
WARNING: DO NOT remove balancer shaft sprocket bolt.
- Remove balancer shaft chain and crankshaft sprocket.
Installation
- Engine at TDC No.1 cylinder.
- There are two types of balancer shaft.
- Type A:
- Align timing marks on balancer shaft sprocket and balancer shaft [17] .
- Retain in position with 4 mm pin [18] .
NOTE: Up to 7 complete turns of balancer shaft may be required to find correct position.
- Type B:
- Align timing mark on balancer shaft sprocket as shown [19] .
- Retain in position with 4 mm pin [20] .
NOTE: Up to 7 complete turns of balancer shaft may be required to find correct position.
- Install balancer shaft chain and crankshaft sprocket.
- Remove 4 mm pin [18] or [20] .
- Remove locking pin [16] .
- Install RH secondary timing chain cassette and bolt [15] .
- Install LH secondary timing chain cassette and bolt [14] .
- Install intermediate shaft rear sprocket bolt [13] . Do not tighten.
- Install intermediate shaft front sprocket, primary chain and bolt [12] . Do not tighten.
- Install primary timing chain guide [10] .
- Install primary timing chain tensioner [9] .
- Hold intermediate shaft front sprocket bolt and tighten intermediate shaft rear sprocket bolt [12] & [13] . Tightening torque: 40 Nm.
- Install intermediate shaft rear sprocket holding tool [11] .
- Tighten intermediate shaft rear sprocket bolt a further 45° [13] .
- Tighten intermediate shaft front sprocket bolt [12] . Tightening torque: 45 Nm + 70°.
- Install timing cover.
- Install crankshaft vibration damper. Fit new crankshaft pulley bolt.
- Install cylinder heads.
- Install camshaft sprocket bolts [4] & [8] . Do not tighten. Ensure camshaft sprockets turn freely but do not tilt.
- Install RH and LH secondary timing chain cassette bolts [3] & [6] .
- Turn the crankshaft 360° to No.1 cylinder at TDC.
- Install crankshaft locking tool [21] .
- Install camshaft alignment tool to front of RH camshaft [22] .
- Install camshaft sprocket locking tool and adapter to rear of RH camshaft [23] .
NOTE: Camshaft groove at lower position.
- Tighten RH camshaft sprocket bolt [4] . Tightening torque: 20 Nm + 100°.
- Install RH secondary timing chain tensioner [2] .
- Remove camshaft alignment tool and camshaft sprocket locking tool from RH cylinder head.
- Install camshaft alignment tool to rear of LH camshaft [22] .
- Install camshaft sprocket locking tool and adapter to front of LH camshaft [23] .
NOTE: Camshaft groove at lower position.
- Tighten LH camshaft sprocket bolt [8] . Tightening torque: 20 Nm + 100°.
- Install LH secondary timing chain tensioner [7] .
- Remove camshaft alignment tool and camshaft sprocket locking tool from LH cylinder head.
- Remove crankshaft locking tool [21] .