Special tools
- Camshafts setting/locking tool – No.303-530.
- Crankshaft positioning tool – No.303-645.
- Crankshaft pulley locking tool – No.303-191.
- Crankshaft pulley locking tool adapter – No.303-191/02.
- Crankshaft pulley removal tool – No.303-588.
- Timing chain tensioning tool – No.303-532.
General precautions
- Disconnect battery earth lead.
- Remove spark plugs to ease turning engine.
- Turn engine in normal direction of rotation (unless otherwise stated).
- Observe tightening torques.
- If fitted: Mark position of crankshaft position (CKP) sensor before removal.
- Do NOT turn crankshaft via camshaft or other sprockets.
- Do NOT turn crankshaft or camshaft with timing chain removed.
Valve timing procedures
Removal
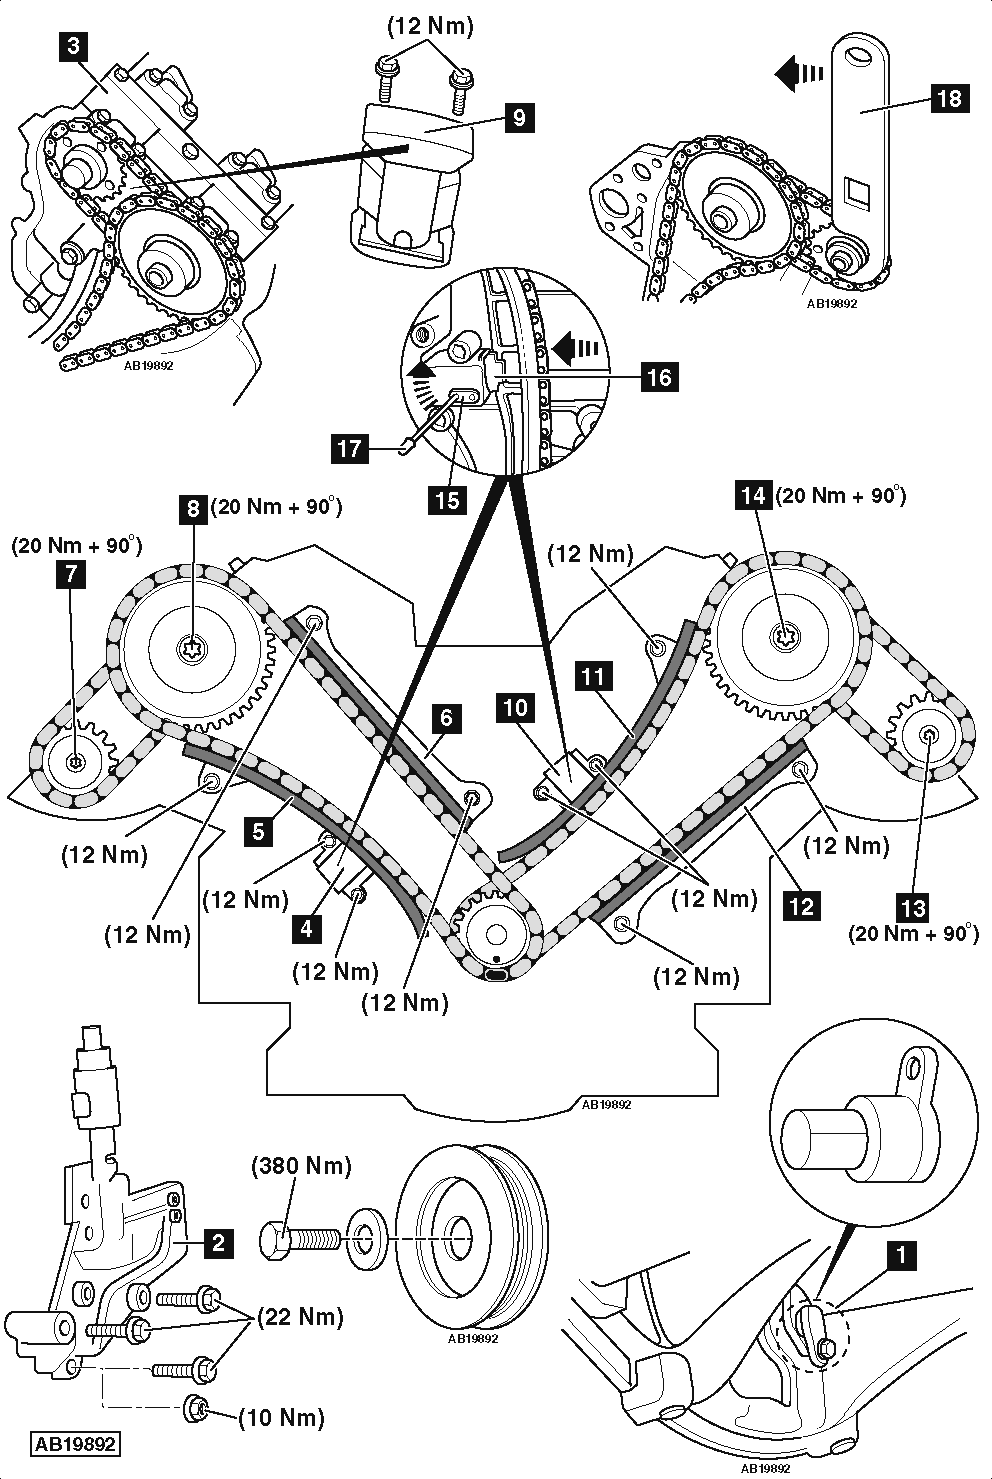
NOTE: Do not use crankshaft positioning tool to remove/install crankshaft pulley.
- Remove crankshaft position (CKP) sensor.
- Turn the crankshaft to align slot for crankshaft positioning tool.
- Fit crankshaft positioning tool [1] .
- Ensure that flats on camshafts are positioned upwards. If not, remove crankshaft positioning tool and turn crankshaft pulley 360°.
- Remove housings of camshaft adjuster control valves [2] .
- Fit camshafts setting/locking tool to RH cylinder head [3] .
- Remove RH timing chain tensioner, rail and guide [4] , [5] & [6] .
- Remove RH timing chain.
- Remove RH exhaust camshaft sprocket bolt [7] .
- Remove RH inlet camshaft sprocket bolt [8] .
- Remove RH camshaft coupling chain tensioner [9] .
- Remove RH camshaft coupling chain and sprockets.
- Fit camshafts setting/locking tool to LH cylinder head [3] .
- Remove LH timing chain tensioner, rail and guide [10] , [11] & [12] .
- Remove LH timing chain.
- Remove LH exhaust camshaft sprocket bolt [13] .
- Remove LH inlet camshaft sprocket bolt [14] .
- Remove LH camshaft coupling chain tensioner [9] .
- Remove LH camshaft coupling chain and sprockets.
Installation
- Ensure crankshaft positioning tool is installed [1] .
- Ensure LH camshafts setting/locking tool is installed [3] .
- Fit LH camshaft coupling chain tensioner [9] . Use new bolts.
- Fit LH camshaft coupling chain and sprockets. Do not tighten bolts.
- Fit LH timing chain, tensioner rail and guide [11] & [12] .
NOTE: Ensure timing chain is taut between sprockets on non-tensioned side.
- Reset chain tensioners [4] & [10] :
- Release tensioner ratchet [15] .
- Compress tensioner plunger [16] .
- Retain in position with 3 mm pin [17] .
- Install LH tensioner [10] .
- Remove locking pin [17] .
- Using the timing chain tensioning tool, tension the LH exhaust sprocket anti-clockwise [18] .
- To prevent engine damage, the inlet camshaft sprocket bolt MUST be tightened before the exhaust camshaft sprocket bolt.
- Tighten LH inlet camshaft sprocket bolt to 20 Nm + 90° [14] .
- Tighten LH exhaust camshaft sprocket bolt to 20 Nm + 90° [13] .
NOTE: Camshaft sprocket bolts MUST only be used once.
- Ensure RH camshafts setting/locking tool is installed [3] .
- Fit RH camshaft coupling chain tensioner [9] . Use new bolts.
- Fit RH camshaft coupling chain and sprockets. Do not tighten bolts.
- Fit RH timing chain, tensioner rail and guide [5] & [6] .
- Install RH tensioner [4] .
- Remove locking pin [17] .
NOTE: Ensure timing chain is taut between sprockets on non-tensioned side.
- Using the timing chain tensioning tool, tension the RH exhaust sprocket anti-clockwise [18] .
- To prevent engine damage, the inlet camshaft sprocket bolt MUST be tightened before the exhaust camshaft sprocket bolt.
- Tighten RH inlet camshaft sprocket bolt to 20 Nm + 90° [8] .
- Tighten RH exhaust camshaft sprocket bolt to 20 Nm + 90° [7] .
NOTE: Camshaft sprocket bolts MUST only be used once.
- Remove LH and RH camshafts setting/locking tools [3] .
- Remove crankshaft positioning tool [1] .
- Fit housings of camshaft adjuster control valves [2] .
- Fit crankshaft pulley. Use new bolt. Tightening torque: 380 Nm.