Special tools
- Exhaust camshaft alignment tool – No.0197-A1.
- Flywheel timing pin – No.0197-B.
- Inlet camshaft alignment tool – No.0197-A3.
General precautions
- Disconnect battery earth lead.
- Remove spark plugs to ease turning engine.
- Turn engine in normal direction of rotation (unless otherwise stated).
- Observe tightening torques.
- If fitted: Mark position of crankshaft position (CKP) sensor before removal.
- Do NOT turn crankshaft via camshaft or other sprockets.
- Do NOT turn crankshaft or camshaft with timing chain removed.
Valve timing procedures
- Ensure camshaft adjusters set in the installation position as follows:
- Turn crankshaft two turns clockwise.
- Turn inlet camshaft slowly anti-clockwise as far as stop [1] .
- Turn exhaust camshaft slowly clockwise as far as stop [2] .
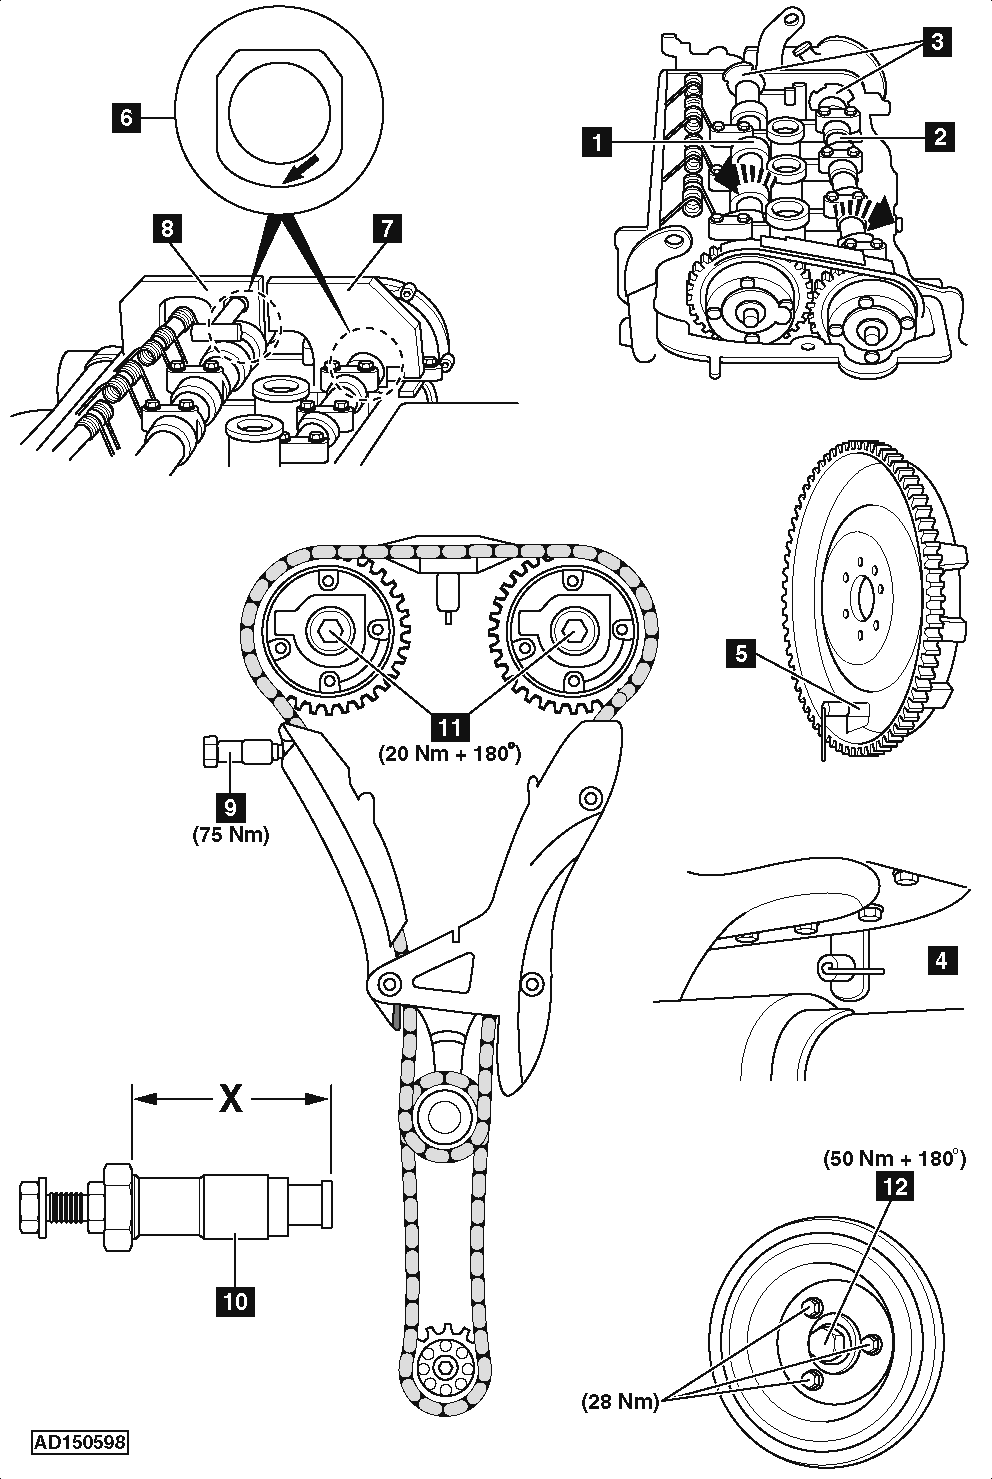
- Camshaft rotation possible using spanner at positions shown [3] .
- Ensure camshafts locked in position.
- Replace camshaft adjuster, if not locked in installation position.
- Fit flywheel timing pin [4] .
- Turn crankshaft clockwise until flywheel timing pin engages [5] .
NOTE: Ensure round section of alignment lobe is facing downwards [6] .
- Install exhaust camshaft alignment tool [7] .
- Install inlet camshaft alignment tool [8] .
- Remove timing chain tensioner [9] .
- Modify old timing chain tensioner to use as timing chain pre-tensioning tool:
- Drill a 10,75 mm diameter hole into hexagon end of tensioner body.
- Insert M10 x 1,5 helicoil and fit M10 x 100 mm bolt with locknut.
- Install timing chain pre-tensioning tool [10] .
- Tighten adjusting screw until in contact with guide rail. DO NOT overtighten screw.
- Pre-load timing chain with pre-tensioning tool to 0,6 Nm.
- Remove camshaft alignment tools [7] & [8] .
- Remove flywheel timing pin [4] .
- Turn crankshaft two turns clockwise.
- Ensure camshaft adjusters in the installation position.
- Fit flywheel timing pin [4] .
- Ensure flywheel timing pin located correctly [5] .
NOTE: Ensure round section of alignment lobe is facing downwards [6] .
- Install exhaust camshaft alignment tool [7] .
- Install inlet camshaft alignment tool [8] .
- Timing correct when camshaft alignment tools abut cylinder head.
- If not, adjust camshafts as follows:
- Remove timing chain pre-tensioning tool [10] .
NOTE: Replace chain, tensioner and guides if ‘X’ more than 73,5 mm.
- Refit timing chain pre-tensioning tool [10] .
- Pre-load timing chain with pre-tensioning tool to 0,6 Nm.
- Remove camshaft alignment tools [7] & [8] .
- Remove central bolt from each camshaft adjuster [11] .
- Camshaft rotation can be prevented using 27 mm spanner at positions shown [3] .
NOTE: Degrease ends of camshafts and camshaft sprockets.
- Fit new bolts [11] . Finger tighten bolts.
- Remove crankshaft pulley centre bolt [12] .
- Fit new crankshaft pulley central bolt [12] . Finger tighten bolt.
- Install exhaust camshaft alignment tool [7] . If necessary, adjust position of exhaust camshaft.
- Install inlet camshaft alignment tool [8] . If necessary, adjust position of inlet camshaft.
- Ensure camshaft alignment tools abut cylinder head. Secure tools with bolts.
- Tighten crankshaft pulley central bolt [12] . Tightening torque: 50 Nm + 180°.
- Tighten inlet camshaft adjuster bolt. Tightening torque: 20 Nm + 180°.
- Tighten exhaust camshaft adjuster bolt. Tightening torque: 20 Nm + 180°.
- Remove timing chain pre-tensioning tool [10] .
- Fit new timing chain tensioner. Tightening torque: 75 Nm.
- Remove camshaft alignment tools [7] & [8] .
- Remove flywheel timing pin [4] .
- Remove timing chain pre-tensioning tool [10] .