Special tools
- Camshaft locking tool – No.T10068A.
- AXZ/BHK/BHL: Crankshaft pulley holding tool – No.T10069.
- BWS: Crankshaft pulley holding tool – No.T10172.
- High-pressure fuel pump sprocket locking tool (with mechanical vacuum pump) – No.T10362.
- High-pressure fuel pump sprocket locking tool (without mechanical vacuum pump) – No.T10332.
General precautions
- Disconnect battery earth lead.
- Remove spark plugs to ease turning engine.
- Turn engine in normal direction of rotation (unless otherwise stated).
- Observe tightening torques.
- If fitted: Mark position of crankshaft position (CKP) sensor before removal.
- Do NOT turn crankshaft via camshaft or other sprockets.
- Do NOT turn crankshaft or camshaft with timing chain removed.
Valve timing procedures
NOTE: If reusing timing chains: Mark direction of rotation on chains.
- Removal/installation of timing chain requires:
- Engine removal.
- Transmission removal.
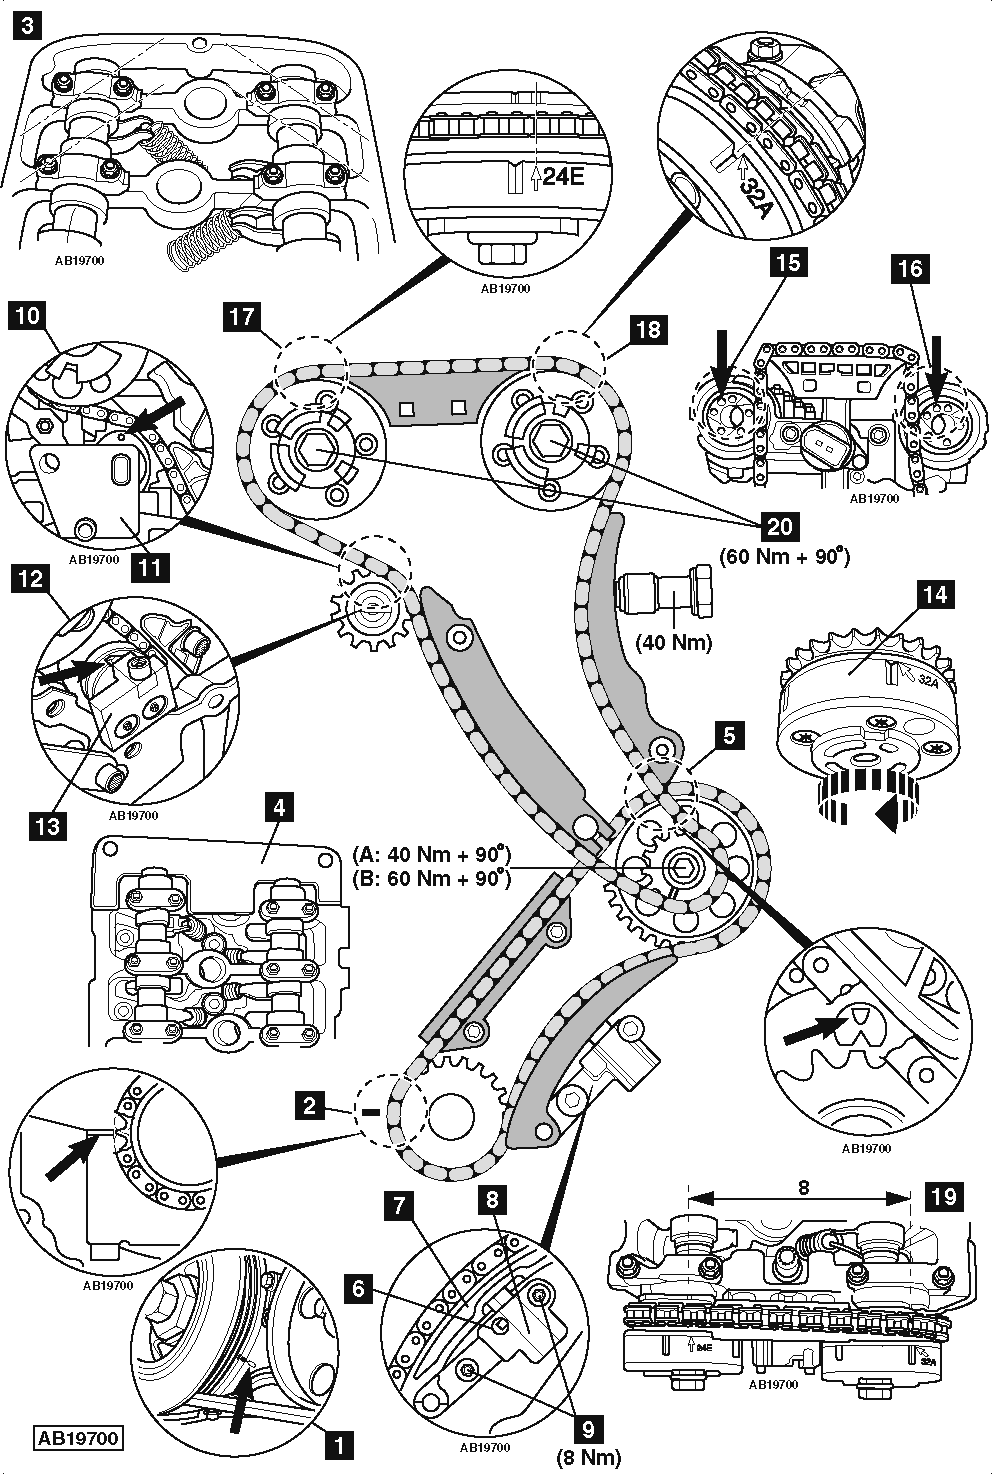
- Engine at TDC on No.1 cylinder [1] .
NOTE: Ground tooth on crankshaft sprocket aligned with rear main bearing joint [2] .
- Ensure camshaft lobes for No.1 cylinder are positioned as shown [3] . If not, turn crankshaft 360°.
- Fit camshaft locking tool [4] .
- Ensure intermediate shaft sprocket timing marks aligned [5] .
- Remove tensioner(s) to ease timing chain removal/installation.
NOTE: If replaced, ensure correct tensioner fitted.
- Reset lower timing chain tensioner:
- Release locking mechanism [6] . Use screwdriver.
- Push tensioner rail [7] against chain tensioner [8] .
NOTE: Lower timing chain tensioner bolts [9] MUST only be used once.
- Tighten tensioner bolts [9] . Tightening torque: 8 Nm.
NOTE: Renew intermediate shaft sprocket bolt.
- Tighten intermediate shaft sprocket bolt:
- A-AXZ: 40 Nm + 90°
- B-BHK/BHL/BWS: 60 Nm + 90°
- Models with mechanical vacuum pump:
- Ensure high-pressure fuel pump sprocket timing mark at 12 o’clock position [10] .
- Fit high-pressure fuel pump sprocket locking tool [11] .
- Models without mechanical vacuum pump:
- Ensure notch on high-pressure fuel pump sprocket at 12 o’clock position [12] .
- Fit high-pressure fuel pump sprocket locking tool [13] .
- Set inlet camshaft position actuator as follows:
- Turn inlet camshaft position (CMP) sensor reluctor fully clockwise as far as stop [14] .
- Fit inlet camshaft sprocket with chain. Align sprocket with hole in camshaft [15] .
- Tighten inlet camshaft position actuator bolt finger tight.
NOTE: Inlet camshaft position actuator marked 24E.
- Set exhaust camshaft position actuator as follows:
- Turn exhaust camshaft position (CMP) sensor reluctor in both directions until locked [14] .
- Fit exhaust camshaft sprocket with chain. Align sprocket with hole in camshaft [16] .
- Tighten exhaust camshaft sprocket bolt finger tight.
NOTE: Exhaust camshaft sprocket marked 32A.
- Ensure timing marks on both camshaft adjusters and on camshaft carrier aligned [17] & [18] .
- Ensure 8 links between timing marks on camshaft sprockets [19] .
NOTE: Fit new camshaft sprocket bolts.
- Install tensioner after timing chain installation.
- Remove high-pressure fuel pump sprocket locking tool [11] or [13] .
- Remove camshaft locking tool [4] .
- Turn the crankshaft two turns clockwise to No.1 cylinder at TDC [1] .
- Fit locking tool to camshafts [4] .
- Ensure timing marks aligned [17] & [18] .
- If not: Repeat timing chain installation.
- Camshaft rotation can be prevented using 27 mm spanner on hexagon.
- Tighten bolt of each camshaft sprocket to 60 Nm + 90° [20] .
NOTE: DO NOT use camshaft locking tool to prevent camshaft rotation [4] .