Peugeot 406 2.2 2004 cambelt change instructions and replacement inteval. Full guide!
Special tools
- Crankshaft timing pin – Peugeot No.(-).0189-B.
- Exhaust camshaft timing pin – Peugeot No.(-).0189-AZ.
- Inlet camshaft timing pin – Peugeot No.(-).0189-L.
- Timing belt retaining clip – Peugeot No.(-).0189-K.
- Tensioner positioning tool – Peugeot No.(-).0189-J.
- Crankshaft locking tools – Peugeot No.(-).0606-A1 & (-).0606-A2.
Special precautions
- Disconnect battery earth lead.
- DO NOT turn crankshaft or camshaft when timing belt removed.
- Remove spark plugs to ease turning engine.
- Turn engine in normal direction of rotation (unless otherwise stated).
- DO NOT turn engine via camshaft or other sprockets.
- Observe all tightening torques.
Repair times – hrs
| Camshaft drive belt/chain – R & I | 2,20 |
Valve timing procedures

Removal
- Raise and support front of vehicle.
- Remove:
- Engine upper cover (if fitted).
- RH front wheel.
- RH splash guard.
- Auxiliary drive belt.
- Engine torque reaction link.
- Support engine (406).
NOTE: To prevent exhaust damage, ensure engine remains in initial position. - Remove RH engine mounting (406).
- Remove:
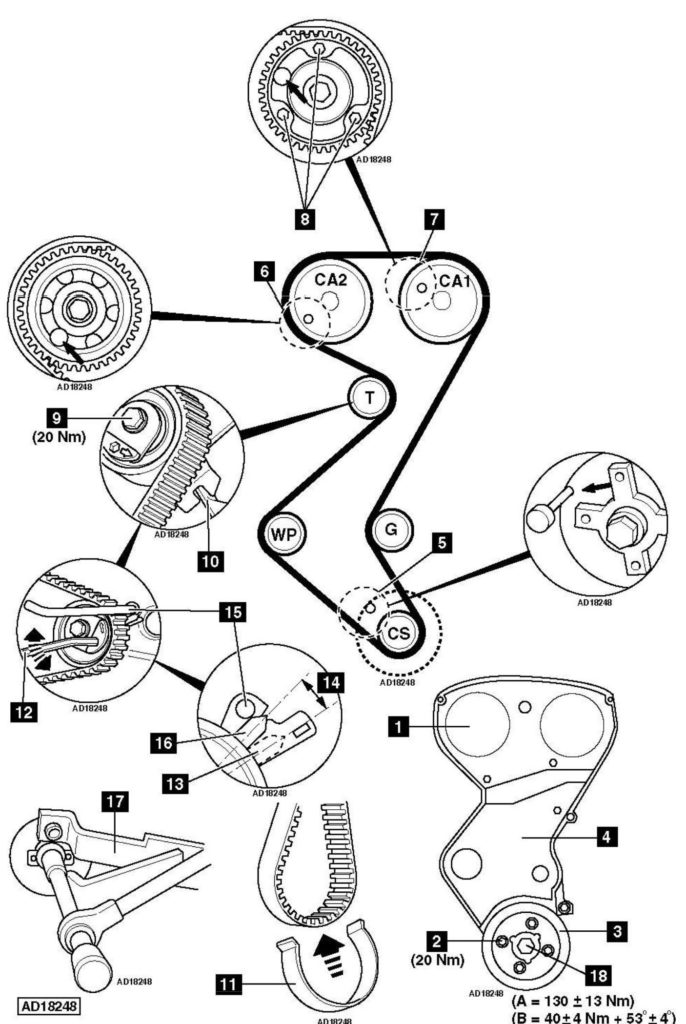
- Timing belt upper cover [1] .
- Crankshaft pulley bolts [2] .
- Crankshaft pulley [3] .
- Timing belt lower cover [4] .
- Turn crankshaft clockwise to setting position.
- Insert timing pin in crankshaft pulley hub [5] . Tool No.(-).0189-B.
- Insert timing pin in exhaust camshaft sprocket [6] . Tool No.(-).0189-AZ.
- Insert timing pin in inlet camshaft sprocket [7] . Tool No.(-).0189-L.
- DO NOT slacken inlet camshaft sprocket bolts [8] .
- Slacken tensioner pulley bolt [9] .
- Unhook tensioner pulley bracket from cylinder block rib [10] .
- Move tensioner pulley away from belt.
- Remove timing belt.
NOTE: Timing belt must always be renewed once it has been removed.
Installation
NOTE: Belt adjustment must be carried out when engine is cold.
- Ensure timing pins located correctly [5] , [6] & [7] .
- Fit timing belt to crankshaft sprocket.
NOTE: Ensure arrow on belt faces direction of rotation. - Secure belt to crankshaft sprocket with retaining clip. Tool No.(-).0189-K [11] .
- Fit timing belt to remaining sprockets and pulleys in following order:
- Guide pulley.
- Inlet camshaft sprocket.
- Exhaust camshaft sprocket.
- Water pump sprocket.
- Tensioner pulley.
NOTE: Ensure belt is taut between sprockets.
- Fit tensioner pulley bracket to cylinder block rib [10] .
- Tighten tensioner pulley bolt finger tight [9] .
- Remove timing belt retaining clip [11] .
- Turn tensioner anti-clockwise until belt tensioned to maximum. Use Allen key [12] . Ensure pointer positioned as shown [13] .
- Ensure pointer moves away from notch by at least 10° [14] . If not, replace tensioner pulley.
- Insert tensioner positioning tool [15] . Tool No.(-).0189-J.
- Turn tensioner clockwise until pointer and positioning tool are just touching [15] & [16] . Use Allen key [12] .
NOTE: Pointer and notch are also aligned. - Tighten tensioner pulley bolt [9] . Tightening torque: 20 Nm.
- Remove tensioner positioning tool [15] .
- Remove timing pins [5] , [6] & [7] .
- Turn crankshaft ten turns clockwise to setting position.
NOTE: DO NOT allow crankshaft to turn anti-clockwise. - Ensure pointer and notch aligned [16] .
- If not: Repeat tensioning procedure.
- Insert timing pin in inlet camshaft sprocket [7] .
- Insert timing pin in crankshaft pulley hub [5] .
- If timing pin [5] cannot be inserted, reposition crankshaft pulley hub as follows:
- Lock crankshaft pulley hub. Use tool Nos.(-).0606-A1/A2 [17] .
- Slacken crankshaft pulley hub bolt [18] .
- Turn crankshaft pulley hub until timing pin can be inserted [5] . Use tool Nos.(-).0606-A1/A2 [17] .
- Tighten crankshaft pulley hub bolt [18] . Tightening torque:
- (A) 406 – 130±13 Nm.
- (B) 607 – 40±4 Nm + 53±4°.
- Remove timing pins [5] & [7] .
- Install components in reverse order of removal.
- Tighten crankshaft pulley bolts [2] . Tightening torque: 20 Nm.
- 406: Tighten RH engine mounting:
- Three bolts securing intermediate bracket to engine bracket – 61 Nm.
- Nut securing engine mounting to intermediate bracket – 45 Nm.
- Tighten engine torque reaction link bolts. Tightening torque: 45 Nm.