Special tools
- Crankshaft turning tool – No.001589650900.
- Flywheel/drive plate locking tool (bell housing) – No.112589034000.
- Timing chain link installer – No.272589003900.
- Timing chain link installer die kit 1 – No.272589006300.
- Timing chain link installer die kit 2 – No.272589016300.
- Timing chain link installer die kit 3 – No.271589016300.
- Timing chain link kit – No.272589036300.
- Timing chain link separator (item 1) – No.602589023300.
- Timing chain link separator (item 2) – No.602589056300.
- Timing chain link separator (item 3) – No.602589056301.
- Tool case – No.602589009800.
General precautions
- Disconnect battery earth lead.
- Remove spark plugs to ease turning engine.
- Turn engine in normal direction of rotation (unless otherwise stated).
- Observe tightening torques.
- Do NOT turn crankshaft via camshaft or other sprockets.
- Do NOT turn crankshaft or camshaft with timing chain removed.
Valve timing procedures
NOTE: Timing chain can be changed without dismantling engine. Using the tools listed above, the new chain can be linked to the old, passed round the sprockets and then joined.
- Engine at 55° BTDC on No.1 cylinder.
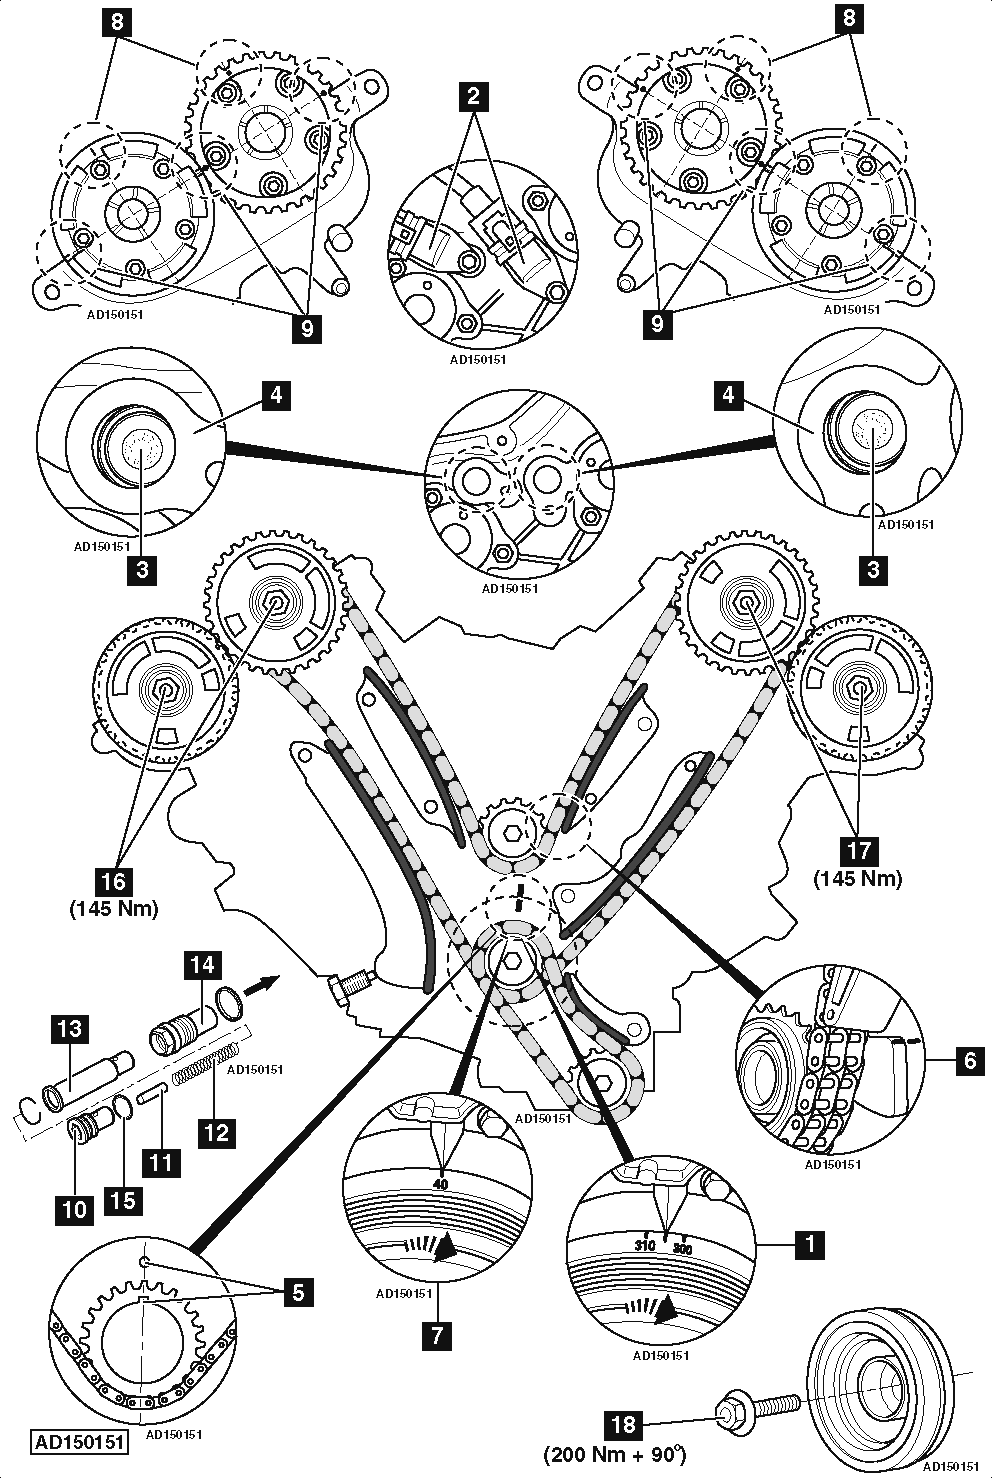
NOTE: Use 305° mark on crankshaft pulley [1] .
- Remove camshaft position (CMP) sensors [2] .
- Ensure timing marks on camshaft sprockets aligned [3] .
NOTE: Mark on each camshaft sprocket MUST align with centre of each camshaft position (CMP) sensor hole [3] & [4] .
- Turn crankshaft clockwise until crankshaft keyway at 12 o’clock position [5] .
- Ensure balancer shaft counterweight aligned with timing mark on crankcase [6] .
- With cylinder head front covers removed:
- Turn crankshaft clockwise to 40° ATDC on No.1 cylinder [7] .
- Ensure camshaft sprocket timing marks at 12 o’clock position [8] .
- Ensure timing mark on camshaft sprockets aligned with edge of cylinder head [9] .
- Tensioner with 22 mm thread:
- Fit new timing chain tensioner. Tightening torque: 70 Nm.
- Tensioner with 24 mm thread, dismantle before installation:
- Remove tensioner nut (tensioned by spring) [10] .
- Remove pin and spring [11] & [12] .
- Push plunger through tensioner body in direction of arrow [13] & [14] .
- Install tensioner after repairs:
- Install tensioner body [14] . Tightening torque: 70 Nm.
- Insert plunger, spring and pin into tensioner body [11] , [12] , [13] & [14] .
- Renew seal ring [15] .
- Install tensioner nut [10] . Tightening torque: 50 Nm.
- Tighten bolt of each camshaft sprocket to 145 Nm [16] & [17] .
NOTE: Crankshaft pulley bolt MUST be renewed.
- Tighten crankshaft pulley bolt to 200 Nm + 90° [18] .