Ford C-Max 1.6 2005 cambelt change instructions and replacement inteval. Full guide!
Special tools
- Camshaft setting bar – Ford No.303-376B.
- Crankshaft timing pin – Ford No.303-748.
- Holding tool – Ford No.205-072.
- Tensioner pulley locking pin – Ford No.303-1054.
Special precautions
- Disconnect battery earth lead.
- DO NOT turn crankshaft or camshaft when timing belt removed.
- Remove spark plugs to ease turning engine.
- Turn engine in normal direction of rotation (unless otherwise stated).
- DO NOT turn engine via camshaft or other sprockets.
- Observe all tightening torques.
Valve timing procedures
Removal
WARNING: Crankshaft sprocket NOT keyed to crankshaft.
- Raise and support front of vehicle.
- Remove:
- RH front wheel.
- RH wheel arch liner.
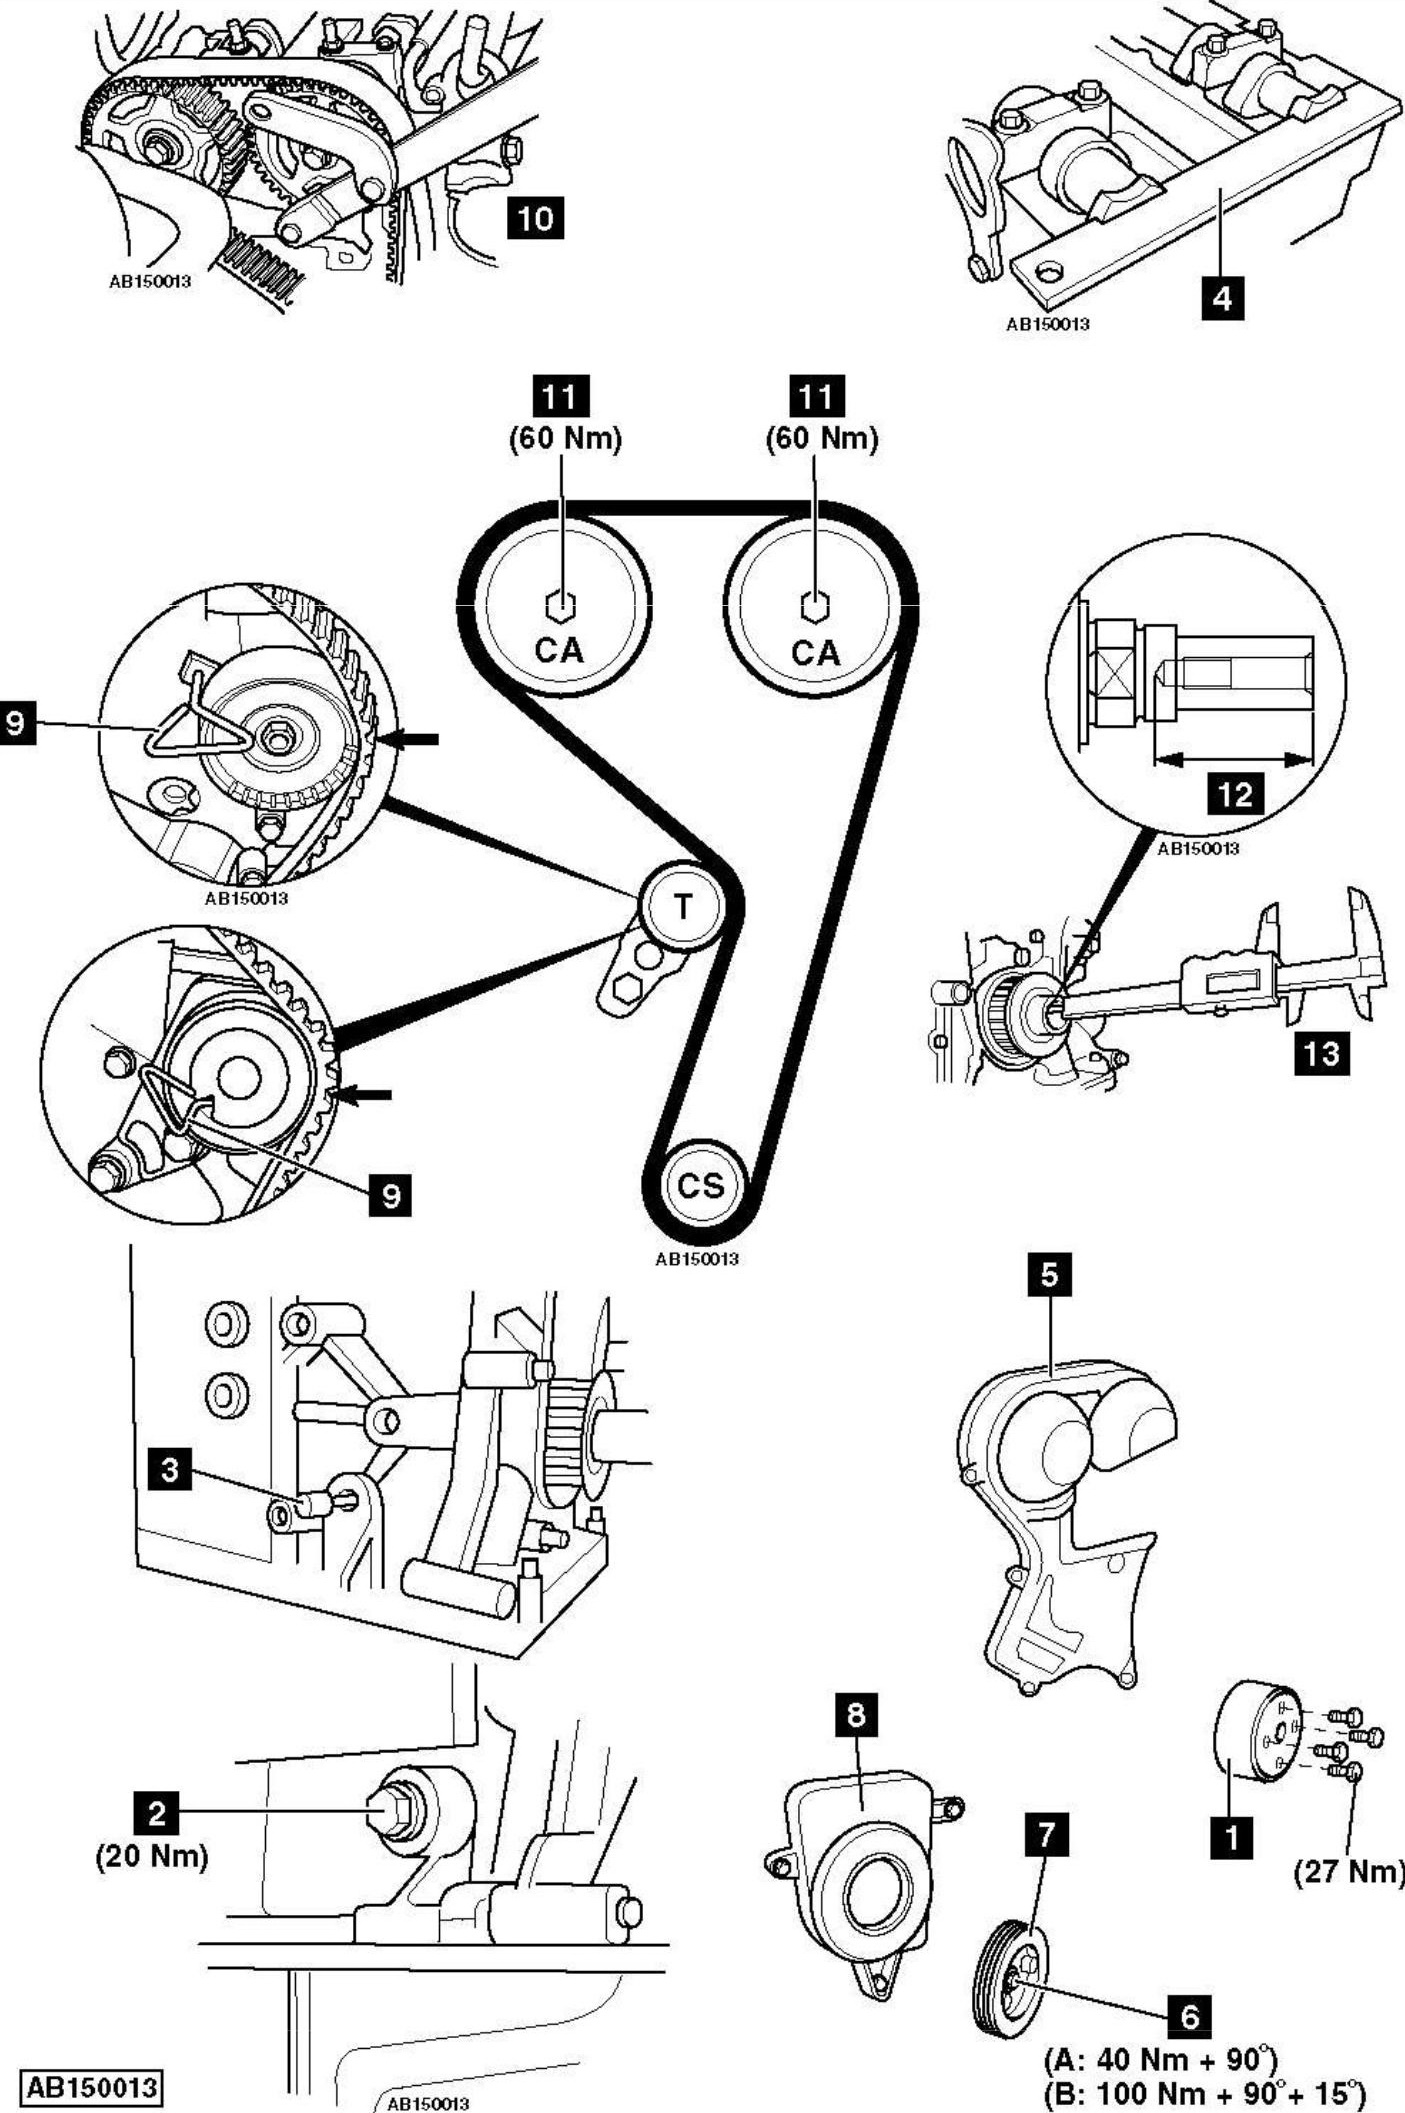
- Water pump pulley [1] .
- Auxiliary drive belt(s).
NOTE: Auxiliary drive belt(s) require cutting and cannot be reused. - Alternator.
- Disconnect:
- Crankcase ventilation hose.
- Camshaft position (CMP) sensor multi-plug.
- Spark plug leads.
- Remove:
- Cylinder head cover.
- PAS reservoir. DO NOT disconnect hoses.
- Disconnect power steering pressure (PSP) switch multi-plug.
- Remove:
- Coolant expansion tank. DO NOT disconnect hoses.
- Blanking plug from cylinder block [2] .
- Turn crankshaft clockwise until just before TDC on No.1 cylinder.
- Fit crankshaft timing pin [3] . Tool No.303-748.
- Turn crankshaft slowly clockwise until it stops against timing pin.
- Ensure camshaft setting bar can be fitted [4] . Tool No.303-376B.
- If setting bar cannot be fitted:
- Remove crankshaft timing pin [3] .
- Turn crankshaft one turn clockwise.
- Fit crankshaft timing pin [3] . Ensure crankshaft web against timing pin.
- Ensure camshaft setting bar can be fitted [4] .
- Support engine.
- Remove:
- RH engine mounting.
- RH engine mounting bracket.
- Timing belt upper cover [5] .
- Remove:
- Crankshaft pulley bolt [6] .
- Crankshaft pulley [7] .
- Timing belt lower cover [8] .
- Push on belt to depress tensioner pulley and insert locking pin [9] . Tool No.303-1054.
- Remove timing belt.
Installation
WARNING: Crankshaft sprocket NOT keyed to crankshaft.
- Ensure crankshaft timing pin located correctly [3] .
- Ensure camshaft setting bar fitted correctly [4] .
- Hold camshaft sprockets [10] . Use tool No.205-072.
NOTE: Use sleeves on holding tool studs to protect camshaft sprockets from damage (part No.E890438S). - Remove bolt of each camshaft sprocket [11] .
- Fit new bolt to each camshaft sprocket [11] . Tighten bolts finger tight.
- Ensure camshaft sprockets can turn freely without tilting.
- Fit timing belt in anti-clockwise direction, starting at crankshaft sprocket.
- Ensure belt is taut between sprockets.
- Remove tensioner pulley locking pin [9] .
- Hold camshaft sprockets [10] .
NOTE: Use sleeves on holding tool studs to protect camshaft sprockets from damage (part No.E890438S). - Tighten bolt of each camshaft sprocket [11] . Tightening torque: 60 Nm.
NOTE: DO NOT use setting bar to hold camshafts when tightening bolts. - Fit timing belt lower cover [8] .
- Check depth of crankshaft threaded hole [12] . Use suitable measuring tool [13] .
- 42 mm: Use new crankshaft pulley bolt (M12 x 29 mm).
- 52 mm: Use new crankshaft pulley bolt (M12 x 44,5 mm).
- 81 mm: Use new crankshaft pulley bolt (M14 x 80 mm).
- Fit crankshaft pulley [7] .
- Tighten crankshaft pulley bolt [6] . Use new bolt. Tightening torque:
- M12: 40 Nm + 90°.
- M14: 100 Nm + 90°. Wait 10 seconds. Tighten crankshaft pulley bolt a further 15°.
- Remove:
- Crankshaft timing pin [3] .
- Camshaft setting bar [4] .
- Turn crankshaft slowly two turns clockwise until just before TDC on No.1 cylinder.
- Fit crankshaft timing pin [3] .
- Turn crankshaft slowly clockwise until it stops against timing pin.
- Ensure camshaft setting bar can be fitted [4] .
- If not: Repeat tensioning procedure.
- Remove:
- Crankshaft timing pin [3] .
- Camshaft setting bar [4] .
- Fit blanking plug to cylinder block [2] . Tightening torque: 20 Nm.
- Install components in reverse order of removal.
NOTE: If battery has been disconnected, re-initialization of window motors may be required.