Special tools
- Camshaft alignment tools – BMW No.11 9 970.
- Crankshaft pulley holding tool – BMW No.11 0 280.
- Crankshaft timing pin – BMW No.11 0 480 or 11 5 320.
- Flywheel locking tool – BMW No.11 9 260.
- Flywheel locking tool adaptor – BMW No.11 9 263.
General precautions
- Disconnect battery earth lead.
- Remove spark plugs to ease turning engine.
- Turn engine in normal direction of rotation (unless otherwise stated).
- Observe tightening torques.
- If fitted: Mark position of crankshaft position (CKP) sensor before removal.
- Do NOT turn crankshaft via camshaft or other sprockets.
- Do NOT turn crankshaft or camshaft with timing chain removed.
Valve timing procedures
- Removal/installation of timing chain requires:
- Sump removal.
- Oil pump removal.
- Checking LH bank valve timing:
- Engine at TDC on No.1 cylinder compression stroke.
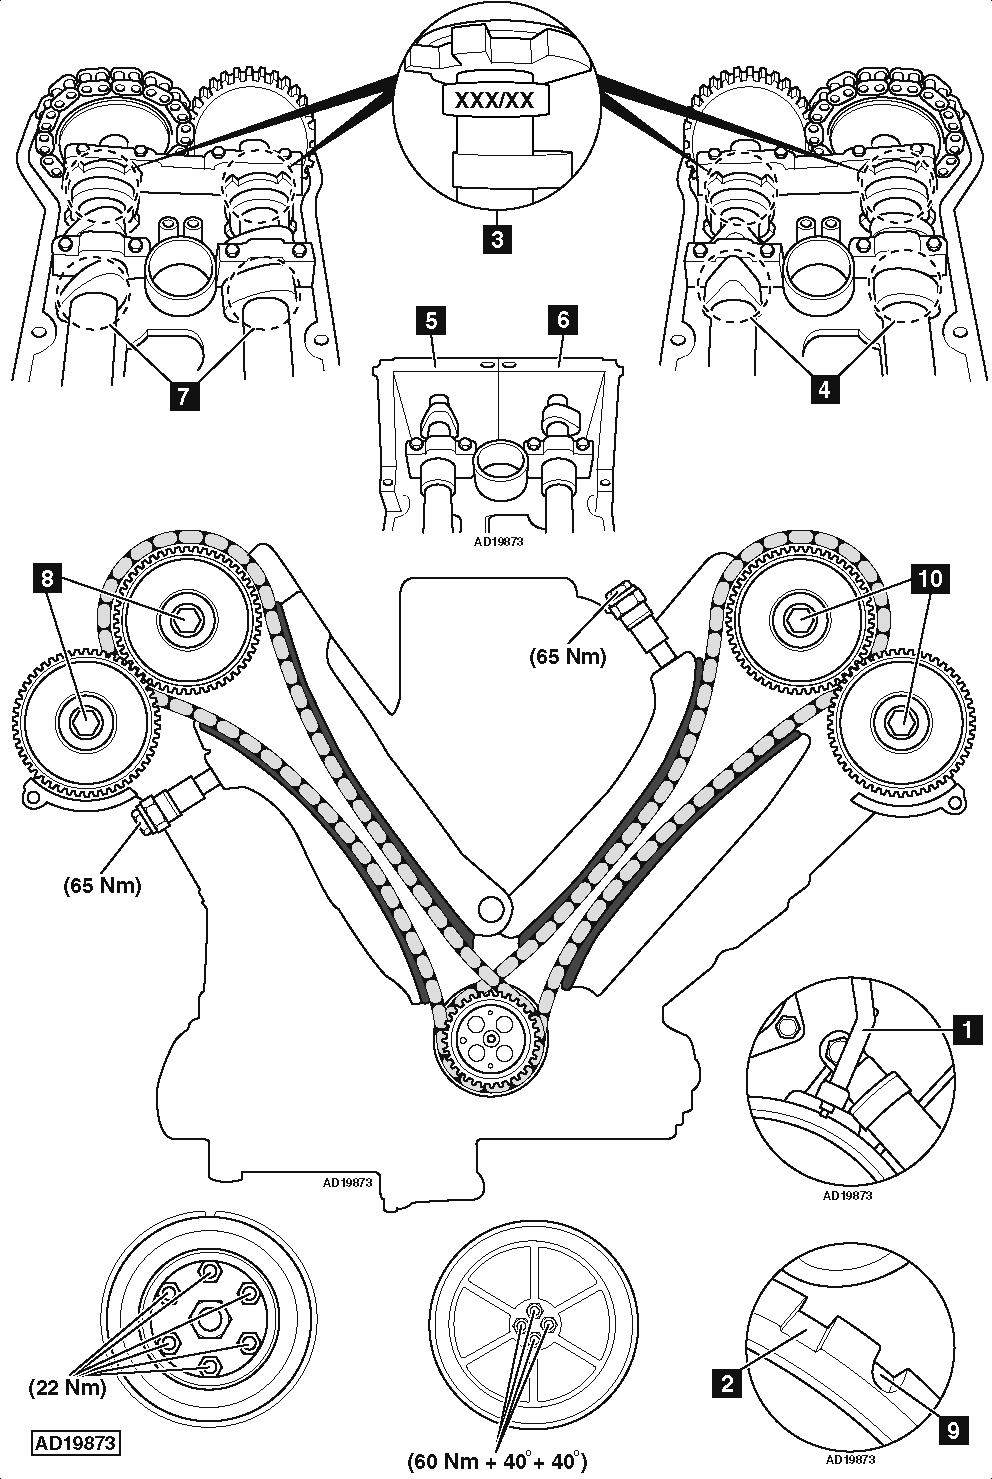
- Insert crankshaft timing pin [1] .
- Ensure crankshaft timing pin engages with TDC slot in crankshaft pulley [2] .
- Ensure part number on each camshaft is facing upwards [3] .
- Ensure camshaft lobes for No.5 cylinder are positioned as shown [4] .
- Install camshaft alignment tools [5] & [6] .
- Timing correct when camshaft alignment tools abut cylinder head or are raised up to a maximum of 1 mm on one side of each alignment tool.
- If not, adjust valve timing.
- Checking RH bank valve timing:
- Remove special tools.
- Turn crankshaft one turn clockwise.
- Engine at TDC on No.1 cylinder exhaust stroke.
- Insert crankshaft timing pin [1] .
- Ensure crankshaft timing pin engages with TDC slot in crankshaft pulley [2] .
- Ensure part number on each camshaft is facing downwards.
- Ensure camshaft lobes for No.1 cylinder are positioned as shown [7] .
- Install camshaft alignment tools [5] & [6] .
- Timing correct when camshaft alignment tools abut cylinder head or are raised up to a maximum of 1 mm on one side of each alignment tool.
- If not, adjust valve timing.
- Remove special tools.
- Adjust LH bank valve timing as follows:
- Engine at TDC on No.1 cylinder compression stroke.
- Ensure part number on each camshaft is facing upwards [3] .
- Install camshaft alignment tool to inlet camshaft [5] .
- Secure tool with bolts. Tightening torque: 10 Nm.
- Install camshaft alignment tool to exhaust camshaft [6] .
- Secure tool with bolts. Tightening torque: 10 Nm.
- Slacken bolt of each camshaft adjuster (LH thread) [10] .
- Replace bolt on each camshaft adjuster and re-tighten by hand (LH thread) [10] .
- Turn crankshaft anti-clockwise to 10° BTDC on No.1 cylinder.
- Insert crankshaft timing pin [1] .
- Ensure crankshaft timing pin engages with 10° BTDC slot in crankshaft pulley [9] .
- Tighten bolt of each camshaft adjuster in four stages [10] .
- Stage 1: Tighten bolt to 20 Nm.
- Stage 2: Tighten bolt to 80 Nm + 200°.
- Stage 3: Slacken 360°.
- Stage 4: Tighten bolt to 10 Nm.
- Tighten bolt of inlet camshaft adjuster first.
- Remove crankshaft timing pin [1] .
- Turn crankshaft clockwise to TDC on No.1 cylinder.
- Insert crankshaft timing pin [1] .
- Ensure crankshaft timing pin engages with TDC slot in crankshaft pulley [2] .
- Tighten bolt of each camshaft adjuster in two stages:
- Stage 1: Tighten bolt to 20 Nm.
- Stage 2: Tighten bolt to 80 Nm + 200°.
NOTE: Tighten bolt of inlet camshaft adjuster first.
- Adjust RH bank valve timing as follows:
- Engine at TDC on No.1 cylinder compression stroke.
- Ensure part number on each camshaft is facing upwards [3] .
- Install camshaft alignment tool to inlet camshaft [6] .
- Turn inlet camshaft slowly anti-clockwise using spanner on hexagon, until camshaft alignment tool abuts cylinder head.
- Secure tool with bolts. Tightening torque: 10 Nm.
- Install camshaft alignment tool to exhaust camshaft [5] .
- Turn exhaust camshaft slowly clockwise using spanner on hexagon, until camshaft alignment tool abuts cylinder head.
- Secure tool with bolts. Tightening torque: 10 Nm.
- Slacken bolt of each camshaft adjuster (LH thread) [8] .
- Replace bolt on each camshaft adjuster and re-tighten by hand (LH thread) [8] .
- Turn crankshaft anti-clockwise to 10° BTDC on No.1 cylinder.
- Insert crankshaft timing pin [1] .
- Ensure crankshaft timing pin engages with 10° BTDC slot in crankshaft pulley [9] .
- Tighten bolt of each camshaft adjuster in four stages [8] .
- Stage 1: Tighten bolt to 20 Nm.
- Stage 2: Tighten bolt to 80 Nm + 200°.
- Stage 3: Slacken 360°.
- Stage 4: Tighten bolt to 10 Nm.
- Tighten bolt of inlet camshaft adjuster first.
- Remove crankshaft timing pin [1] .
- Turn crankshaft clockwise to TDC on No.1 cylinder.
- Insert crankshaft timing pin [1] .
- Ensure crankshaft timing pin engages with TDC slot in crankshaft pulley [2] .
- Tighten bolt of each camshaft adjuster in two stages:
- Stage 1: Tighten bolt to 20 Nm.
- Stage 2: Tighten bolt to 80 Nm + 200°.
NOTE: Tighten bolt of inlet camshaft adjuster first.