BMW 5 E39 2003 cambelt change instructions and replacement inteval. Full guide!
Special tools
- Flywheel timing pin – BMW No.11 2 300.
- Camshaft alignment tool – BMW No.11 3 240/244.
- Timing chain pre-tensioning tool – BMW No.11 4 220.
- Tensioner locking tool – BMW No.11 3 292.
- Crankshaft pulley/hub puller (one-piece pulley) – No.11 8 190/200/210.
- Crankshaft pulley/hub puller (two-piece pulley) – No.11 2 150/410.
- Camshaft timing setting tool – BMW No.11 6 150.
- Camshaft sprockets alignment tool – BMW No.11 6 180.
- VANOS unit checking tool – BMW No.11 3 450.
Special precautions
- Disconnect battery earth lead.
- DO NOT turn crankshaft or camshaft when timing belt removed.
- Remove glow plugs to ease turning engine.
- Turn engine in normal direction of rotation (unless otherwise stated).
- DO NOT turn engine via camshaft or other sprockets.
- Observe all tightening torques.
Valve timing procedures
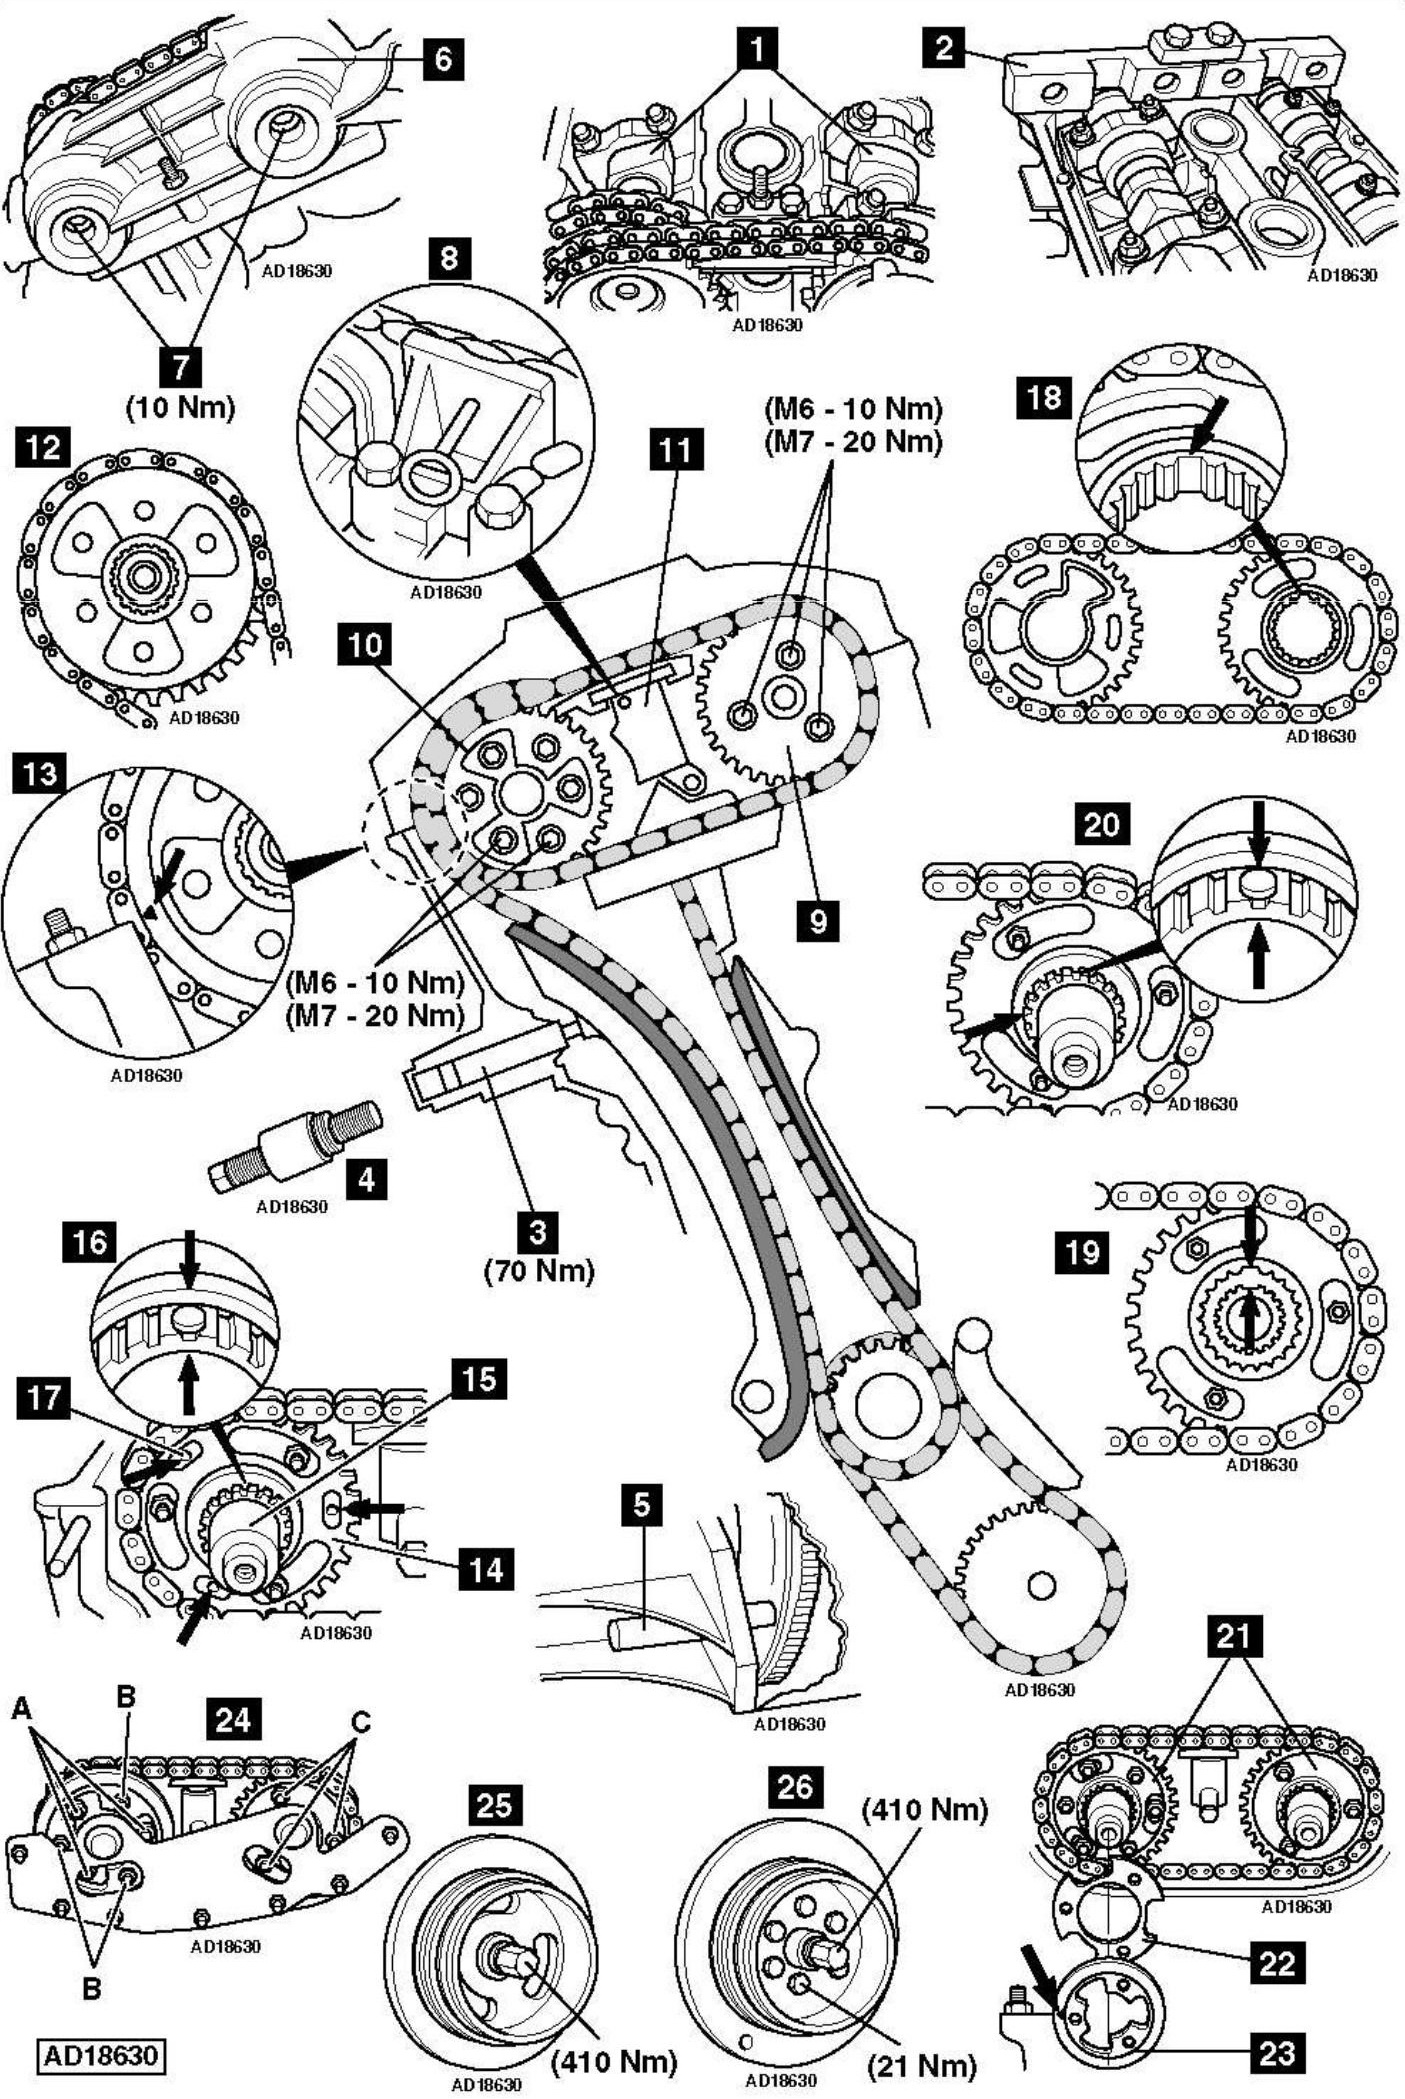
Removal
- Removal/installation of timing chain requires:
- Sump removal, if two-piece crankshaft pulley/damper is fitted.
- Engine at TDC No.1 cylinder.
- Ensure camshaft lobes are facing [1] .
- Ensure camshaft alignment tool can be fitted [2] .
- If not, adjust camshafts as follows:
NOTE: Tensioner plunger is spring loaded.
- Remove tensioner [3] .
- Pre-load timing chain with tool to 0,7 Nm [4] .
- Unscrew VANOS unit oil pressure pipe.
- Connect compressed air (2-8 bar) to VANOS unit. Use special tool.
- Turn crankshaft two turns until camshaft lobes face each other [1] .
- Insert flywheel timing pin [5] .
- Ensure camshaft alignment tool can be refitted [2] .
- Remove VANOS unit [6] .
NOTE: Screws behind sealing caps have LH threads [7] .
- Remove timing chain pre-tensioning tool [4] .
- Depress secondary tensioner and lock with tool [8] .
- Remove intake and exhaust camshaft sprockets [9] & [10] complete with secondary chain.
- Remove secondary tensioner [11] .
- Remove camshaft sprocket and chain [12] .
Installation
- Fit sprockets with chains as follows:
- Fit exhaust camshaft sprocket with chain. Ensure arrow on sprocket aligned with upper edge of cylinder head [13] .
- Fit chain pre-tensioning tool [4] .
- Screw in adjusting screw until in contact with guide rail (DO NOT tighten screw). If necessary, realign camshaft sprocket [13] .
- Fit secondary tensioner [11] .
- Fit toothed sleeve [14] and toothed shaft with pin [15] to exhaust camshaft sprocket. Ensure tooth gaps aligned towards each other [16] .
- Push in toothed shaft until threaded holes positioned in centre of slots [17] .
- Align camshaft sprockets with secondary chain in position as shown [18] . Use special tool.
- During installation of camshaft sprockets, ensure tooth gaps on intake side aligned towards each other [19] . Fit toothed shaft with pin to intake camshaft sprocket. Push in toothed shaft until only 1 mm of spline is visible [20] . Fit washers and nuts [21] . DO NOT tighten.
- Fit plate spring with mark ‘F’ visible [22] and sensor gear [23] to exhaust camshaft.
- Ensure arrow on sensor gear aligned with upper edge of cylinder head [23] . DO NOT tighten nuts. Pull out toothed shaft on exhaust side as far as stop.
- Fit and release secondary tensioner [8] . Pre-load timing chain with tool to 0,7 Nm [4] .
- Slightly pre-load plate spring by pressing on sensor gear [23] . Tighten nuts fingertight. Set camshaft timing with tool as follows:
NOTE: Remove gasket before fitting special tool No.11 6 150 [24] .
- Tighten screws and nuts in two stages (in sequence shown) [24] :
- First stage: 5 Nm.
- Second stage: ‘A’ – 20 Nm. ‘B’, ‘C’ – 10 Nm.
- Fit timing chain tensioner [3] .
- Remove alignment tools and turn crankshaft two turns.
- Ensure No.1 cylinder at TDC. Use special tools.
- Remove camshaft timing setting tool [24] .
- Fit VANOS unit [6] .
NOTE: Screws behind sealing caps have LH threads [7] .
- Replace sealing caps. Tighten sealing caps to 50 Nm.
- Engine with one-piece crankshaft pulley/damper [25] .
- Engine with two-piece crankshaft pulley/damper [26] .
NOTE: Crankshaft pulley central bolt MUST only be used once.