Special tools
- Crankshaft pulley installer – Jaguar No.303-102/335/2.
- Crankshaft pulley puller – Jaguar No.303-D121.
- Crankshaft vibration damper holder/wrench strap – Jaguar No.303-D055.
General precautions
- Disconnect battery earth lead.
- Remove spark plugs to ease turning engine.
- Turn engine in normal direction of rotation (unless otherwise stated).
- Observe tightening torques.
- If fitted: Mark position of crankshaft position (CKP) sensor before removal.
- Do NOT turn crankshaft via camshaft or other sprockets.
- Do NOT turn crankshaft or camshaft with timing chain removed.
Valve timing procedures

Removal
- Removal/installation of timing chain requires:
- Engine removal.
- Sump removal.
NOTE: Refer to Autodata Technical Data for tightening torques.
NOTE: Refer to Technical Data module for tightening torques.
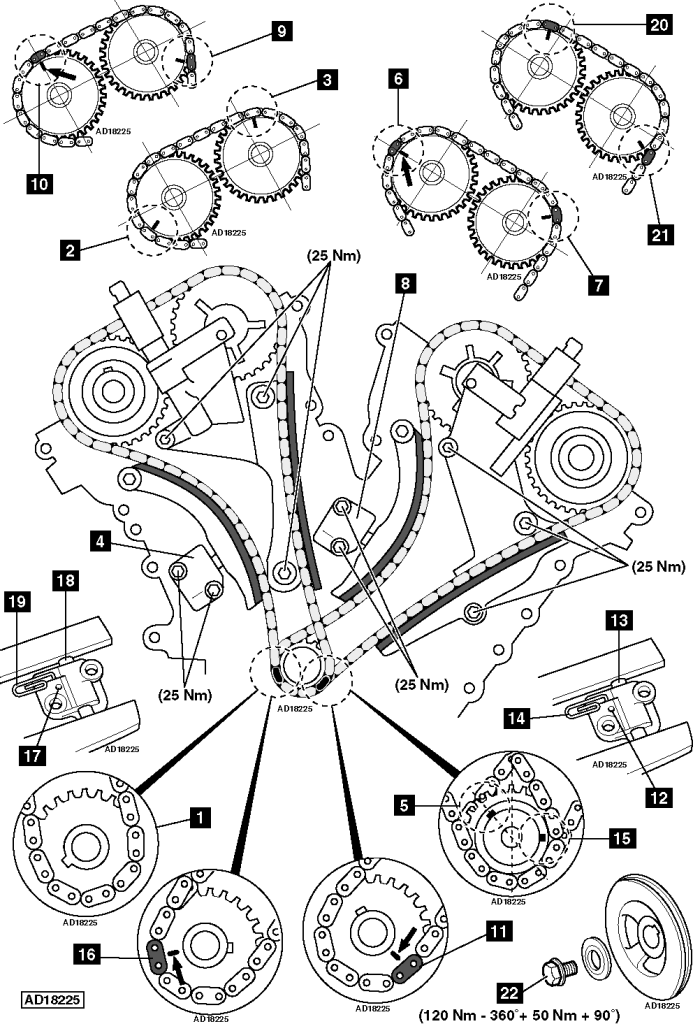
- Ensure crankshaft sprocket keyway at 7 o’clock position [1] .
- Ensure timing mark on RH inlet camshaft sprocket at 1 o’clock [3] .
- Ensure timing mark on RH exhaust camshaft sprocket at 8 o’clock [2] .
- Remove:
- RH chain tensioner [4] , RH tensioner rail, RH chain guide and RH chain.
- Turn crankshaft clockwise until crankshaft keyway at 11 o’clock position [5] .
- Ensure timing mark on LH inlet camshaft sprocket at 9 o’clock [6] .
- Ensure timing mark on LH exhaust camshaft sprocket at 2 o’clock [7] .
NOTE: Coloured links may not be aligned.
- Remove:
- LH chain tensioner [8] , LH tensioner rail, LH chain guide and LH chain.
Installation
- Remove bearing caps of each RH camshaft.
- Rotate RH inlet camshaft until timing mark at 5 o’clock position [9] .
- Rotate RH exhaust camshaft until timing mark at 12 o’clock position [10] .
- Tighten bearing caps of each RH camshaft.
- Ensure crankshaft sprocket keyway at 11 o’clock position [5] .
- Fit crankshaft sprocket for LH chain.
- Fit LH chain. Align coloured chain links with timing mark on each sprocket [6] , [7] & [11] .
- Fit LH chain guides.
- Release LH tensioner ratchet [12] .
- Compress tensioner plunger [13] .
- Retain in position with wire clip [14] .
- Install tensioner assembly [8] .
- Remove wire clip [14] .
- Turn crankshaft clockwise 120° until crankshaft keyway at 3 o’clock position [15] .
- Fit crankshaft sprocket for RH chain.
- Fit RH chain. Align coloured chain links with timing mark on each sprocket [9] , [10] & [16] .
- Fit RH chain guides.
- Release RH tensioner ratchet [17] .
- Compress tensioner plunger [18] .
- Retain in position with wire clip [19] .
- Install tensioner assembly [4] .
- Remove wire clip [19] .
- Ensure timing marks aligned [9] , [10] , [16] , [20] & [21] .
- Crankshaft pulley bolt MUST only be used once.
- Tighten crankshaft pulley bolt to 120 Nm. Slacken 360°. Tighten to 50 Nm + 90° [22] .