Skip to content
Special tools
- Camshaft alignment tool 1 – No.EN-48383-1.
- Camshaft alignment tool 2 – No.EN-48383-2.
- Camshaft alignment tool 3 – No.EN-48383-3.
- Crankshaft alignment/turning tool – No.EN-48589.
- Crankshaft pulley holding tool – No.EN-47981.
- Crankshaft pulley holding tool handle – No.EN-956-1.
- Crankshaft pulley installer – No.EN-41998-B.
- Crankshaft pulley removal tool – No.EN-47982.
- Flywheel/drive plate locking tool – No.EN-46106.
- Tensioner locking pin – No.EN-46112.
- Tensioner plunger resetting tool – No.EN-49416.
General precautions
- Disconnect battery earth lead.
- Remove spark plugs to ease turning engine.
- Turn engine in normal direction of rotation (unless otherwise stated).
- Observe tightening torques.
- If fitted: Mark position of crankshaft position (CKP) sensor before removal.
- Do NOT turn crankshaft via camshaft or other sprockets.
- Do NOT turn crankshaft or camshaft with timing chain removed.
 How to replace timing chain on Vauxhall/Opel Insignia 2.8 Turbo 4×4
Valve timing procedures
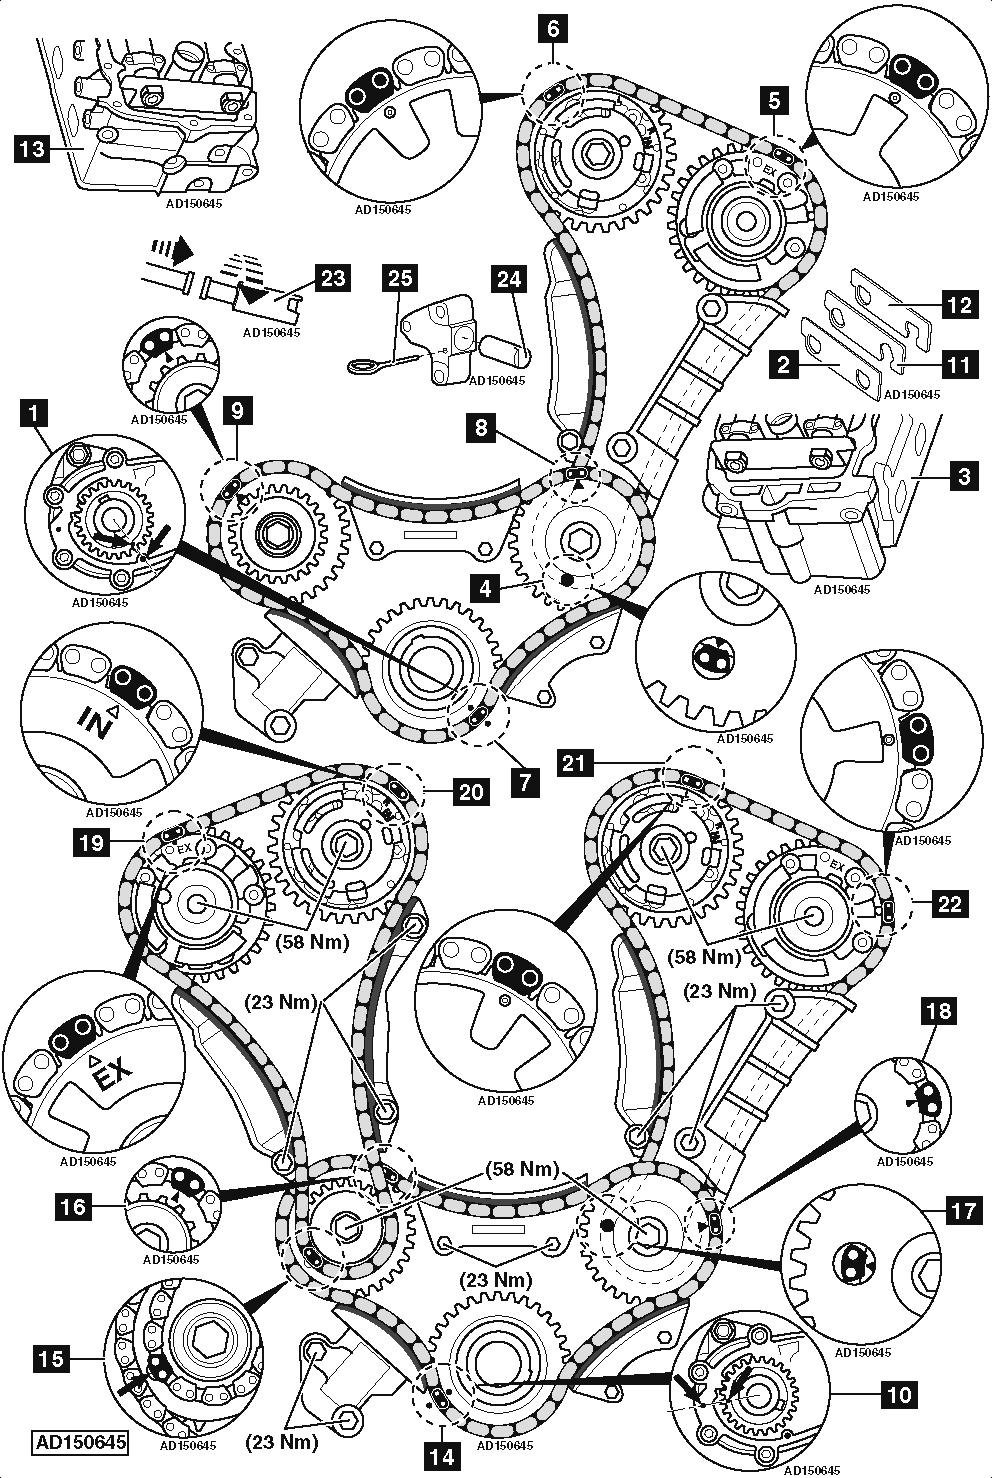
- Stage 1 alignment position (LH bank):
- Using crankshaft alignment/turning tool, rotate the crankshaft clockwise to the stage 1 alignment position [1] .
- Install camshaft alignment tool 1 to rear of LH camshafts [2] & [3] .
- Ensure LH secondary timing chain coloured chain links aligned with timing mark on each sprocket [4] , [5] & [6] .
- Ensure there are 10 chain links located between the timing marks on both camshaft sprockets [5] & [6] .
- Ensure there are 22 chain links located between the timing marks on both camshaft sprockets [4] & [5] .
- Ensure there are 22 chain links located between the timing marks on both camshaft sprockets [4] & [6] .
- Ensure primary timing chain coloured chain links aligned with timing mark on each sprocket [7] , [8] & [9] .
- Remove camshaft alignment tool 1.
- Stage 2 alignment position (RH bank):
- Using crankshaft alignment/turning tool, rotate the crankshaft 115° clockwise to the stage 2 alignment position [10] .
- Install camshaft alignment tool 2 to rear of LH camshafts [11] & [3] .
- Install camshaft alignment tool 3 to rear of RH camshafts [12] & [13] .
- Ensure coloured chain links aligned with timing marks on sprockets [14] , [15] , [16] , [17] , [18] , [19] , [20] , [21] & [22] .
- Ensure there are 10 chain links located between the timing marks on both camshaft sprockets [19] & [20] .
- Ensure there are 22 chain links located between the timing marks on both camshaft sprockets [15] & [19] .
- Ensure there are 22 chain links located between the timing marks on both camshaft sprockets [15] & [20] .
- Remove camshaft alignment tools.
- Set the timing chain tensioners before installation:
- Using tensioner plunger resetting tool, turn tensioner plunger clockwise while pushing inward until locked in position [23] .
- Insert tensioner plunger fully into tensioner body [24] .
- Insert tensioner locking pin into tensioner body [25] .
- To release tensioner plunger after installation:
- Remove tensioner locking pin [25] .
- Press tensioner rail briefly against tensioner to unlock tensioner plunger.