Special tools
- Camshaft adjuster holding tool – No.EN-48953.
- Crankshaft pulley alignment tool – No.EN-48585.
- Crankshaft pulley holding tool – No.EN-38122-A.
- Flywheel/drive plate holding tool – No.EN-43653.
- Tensioner plunger resetting tool – No.EN-45027-1/2.
General precautions
- Disconnect battery earth lead.
- Remove spark plugs to ease turning engine.
- Turn engine in normal direction of rotation (unless otherwise stated).
- Observe tightening torques.
- If fitted: Mark position of crankshaft position (CKP) sensor before removal.
- Do NOT turn crankshaft via camshaft or other sprockets.
- Do NOT turn crankshaft or camshaft with timing chain removed.
Valve timing procedures
Removal
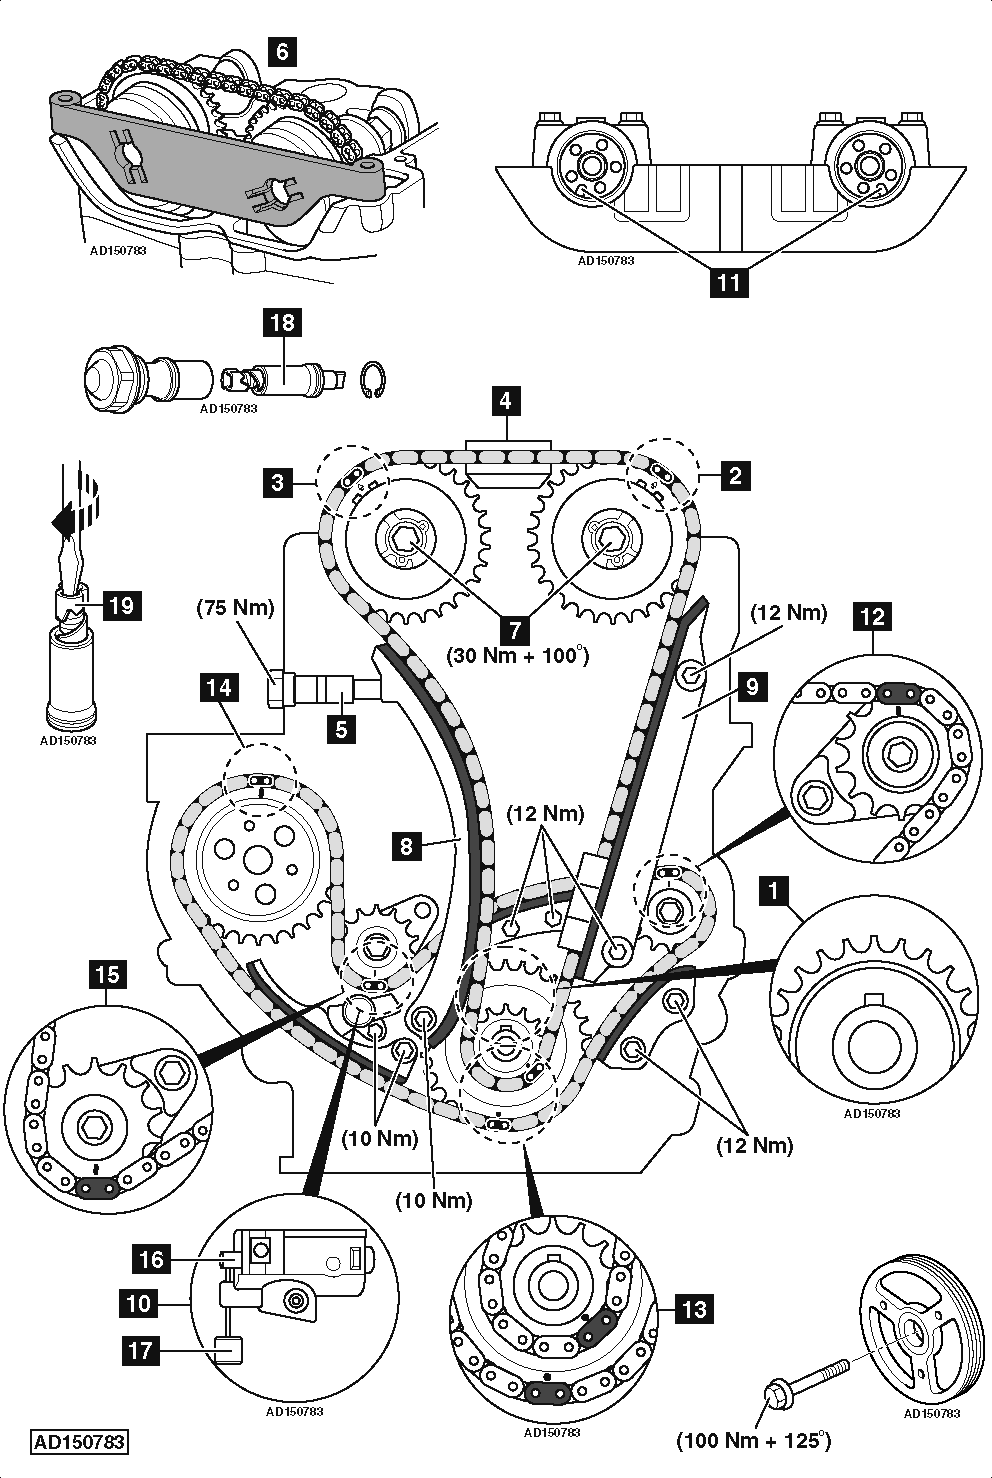
- Engine at TDC on No.1 cylinder.
- Ensure crankshaft keyway at 12 o’clock position [1] .
- Ensure timing mark on each camshaft adjuster positioned as shown [2] & [3] .
- Remove upper chain guide [4] .
- Remove timing chain tensioner [5] .
- Hold camshaft adjusters with holding tool [6] .
- Slacken bolt of each camshaft adjuster [7] .
- Remove camshaft adjuster holding tool [6] .
- Remove exhaust camshaft adjuster.
- Remove tensioner rail and chain guide [8] & [9] .
- Remove inlet camshaft adjuster and chain.
NOTE: Crankshaft sprocket friction washers (if fitted) MUST be replaced.
- Remove balancer shaft chain tensioner [10] .
- Remove balancer shaft chain guides and tensioner rail.
- Remove balancer shaft chain.
Installation
- Engine at TDC on No.1 cylinder.
- Ensure crankshaft keyway at 12 o’clock position [1] .
- Ensure camshaft dowels aligned as shown [11] .
- Fit balancer shaft chain ensuring coloured links aligned with timing marks [12] , [13] , [14] & [15] .
- Install balancer shaft chain guides and tensioner rail.
- Reset balancer shaft chain tensioner [10] :
- Turn tensioner plunger clockwise 90° [16] .
- Push plunger into tensioner housing.
- Turn tensioner plunger anti-clockwise 90° [16] .
- Insert suitable pin to lock tensioner plunger [17] .
- Install balancer shaft chain tensioner [10] .
- Remove pin from tensioner [17] .
- Install inlet camshaft adjuster and timing chain as an assembly. Tighten inlet camshaft adjuster bolt finger tight.
- Install tensioner rail [8] .
- Install exhaust camshaft adjuster. Finger tighten bolt.
- Ensure coloured chain links aligned with timing marks on sprockets [2] , [3] & [13] .
- Install chain guide [9] .
- Reset timing chain tensioner [5] :
- Remove tensioner plunger [18] .
- Turn inner plunger clockwise until it locks [19] .
- Refit tensioner plunger.
- Install timing chain tensioner [5] .
- Hold camshaft adjusters with holding tool [6] .
- Tighten bolt of each camshaft adjuster to 30 Nm + 100° [7] .
- Turn crankshaft anti-clockwise slightly to release tensioner plunger.
- Remove camshaft adjuster holding tool [6] .
- Ensure coloured chain links aligned with timing marks on sprockets [2] , [3] , [12] , [13] , [14] & [15] .
NOTE: Crankshaft pulley bolt MUST be renewed.