Special tools
- Camshaft alignment/locking tool – BMW No.11 6 320.
- Flywheel locking tool – BMW No.11 8 010 (AT version GM-5).
- Flywheel locking tool – BMW No.11 8 182/11 8 183 (AT version 6HP-19).
- Flywheel locking tool – BMW No.11 8 182/11 8 183/11 8 185 (MT version H).
- Flywheel timing pin – BMW No.11 2 300.
- Timing chain tensioner locking pins – BMW No.11 3 340.
General precautions
- Disconnect battery earth lead.
- Remove glow plugs to ease turning engine.
- Turn engine in normal direction of rotation (unless otherwise stated).
- Observe tightening torques.
- Do NOT turn crankshaft via camshaft or other sprockets.
- Do NOT turn crankshaft or camshaft with timing chain removed.
Valve timing procedures
- Removal/installation of timing chain requires:
- Cylinder head removal.
- Sump removal.
NOTE: Refer to Autodata Technical Data for tightening sequence and torques.
NOTE: Refer to Technical Data module for tightening torques.
- Engine at TDC on No.1 cylinder.
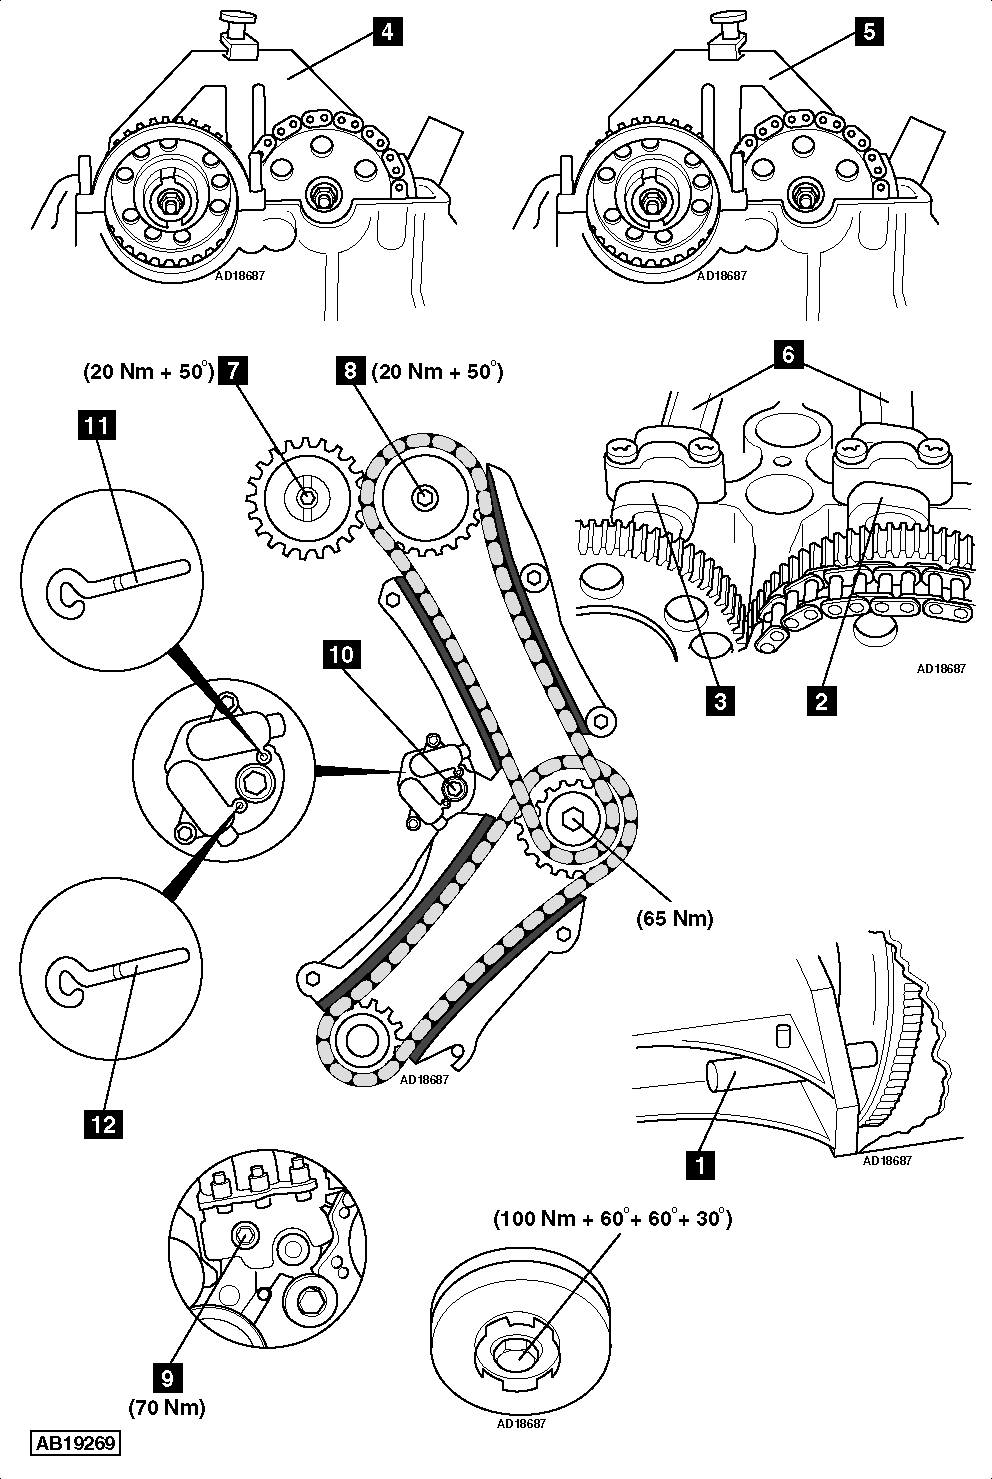
- Insert flywheel timing pin [1] .
- Ensure camshaft lobes are positioned as shown [2] & [3] .
- Install camshaft alignment/locking tool on inlet camshaft [4] .
- Ensure camshaft alignment/locking tool abuts cylinder head.
- Remove camshaft alignment/locking tool.
- Install camshaft alignment/locking tool on exhaust camshaft [5] .
- Ensure camshaft alignment/locking tool abuts cylinder head.
- If not, adjust camshafts as follows:
- Hold camshafts with spanner on hexagon [6] .
- Slacken camshaft sprocket bolts [7] & [8] .
- Ensure camshaft sprockets turn freely but do not tilt.
- Ensure inlet camshaft lobe positioned as shown [2] .
- If necessary, adjust position of inlet camshaft.
- Install camshaft alignment/locking tool on inlet camshaft [4] .
- Ensure camshaft alignment/locking tool abuts cylinder head.
- Hold inlet camshaft with spanner on hexagon [6] .
- Tighten inlet camshaft sprocket bolt [8] . Tightening torque: 20 Nm + 50°.
NOTE: Camshaft sprocket bolt MUST only be used once.
- Remove camshaft alignment/locking tool.
- Ensure exhaust camshaft lobe positioned as shown [3] .
- If necessary, adjust position of exhaust camshaft.
- Install camshaft alignment/locking tool on exhaust camshaft [5] .
- Ensure camshaft alignment/locking tool abuts cylinder head.
- Hold exhaust camshaft with spanner on hexagon [6] .
- Tighten exhaust camshaft sprocket bolt [7] . Tightening torque: 20 Nm + 50°.
NOTE: Camshaft sprocket bolt MUST only be used once.
- Remove camshaft alignment/locking tool.
- Remove flywheel timing pin.
- Turn crankshaft two turns clockwise. Check valve timing.
- To lock upper timing chain tensioner:NOTE: Only upper timing chain tensioner can be reset with front timing chain cover in place.
- Remove blanking plug [9] .
- Slacken oil pressure relief bolt [10] .
- Turn inlet camshaft slowly clockwise to compress the upper timing chain tensioner.
- Camshaft rotation possible using spanner on hexagon [6] .
- Insert timing chain tensioner locking pin [11] .
- To lock lower timing chain tensioner:
- Remove timing chain cover.
- Compress tensioner plunger. Fit timing chain tensioner locking pin [12] .
- To unlock timing chain tensioners:
- Remove locking pins [11] & [12] .
- Tighten oil pressure relief bolt [10] .
- Fit new crankshaft pulley bolt. Tightening torque: 100 Nm + 60° + 60° + 30°.
NOTE: Camshafts can be fitted without valves contacting pistons when crankshaft is set at 45° BTDC on No.1 cylinder.