Special tools
- Camshaft alignment tool 1 – BMW No.11 7 251.
- Camshaft alignment tool 2 – BMW No.11 7 252.
- Camshaft alignment tool 3 – BMW No.11 7 253.
- Flywheel timing pin 1 – BMW No.11 5 120.
- Flywheel timing pin 2 – BMW No.11 9 190.
- Sensor gear alignment tool – BMW No.11 7 260.
- Timing chain pre-tensioning tool – BMW No.11 9 340.
- Torque wrench – BMW No.00 9 250.
- Vibration damper hub holding tool – BMW No.11 9 280.
General precautions
- Disconnect battery earth lead.
- Remove spark plugs to ease turning engine.
- Turn engine in normal direction of rotation (unless otherwise stated).
- Observe tightening torques.
- If fitted: Mark position of crankshaft position (CKP) sensor before removal.
- Do NOT turn crankshaft via camshaft or other sprockets.
- Do NOT turn crankshaft or camshaft with timing chain removed.
Valve timing procedures
- Removal/installation of timing chain requires:
- Sump removal.
NOTE: Refer to Autodata Technical Data for tightening torques.
NOTE: Refer to Technical Data module for tightening torques.
- Engine at TDC on No.1 cylinder.
- Insert flywheel timing pin [1] .
- Ensure rear of camshafts correctly aligned [2] .
NOTE: Curved profile at rear of camshaft points upwards [3] .
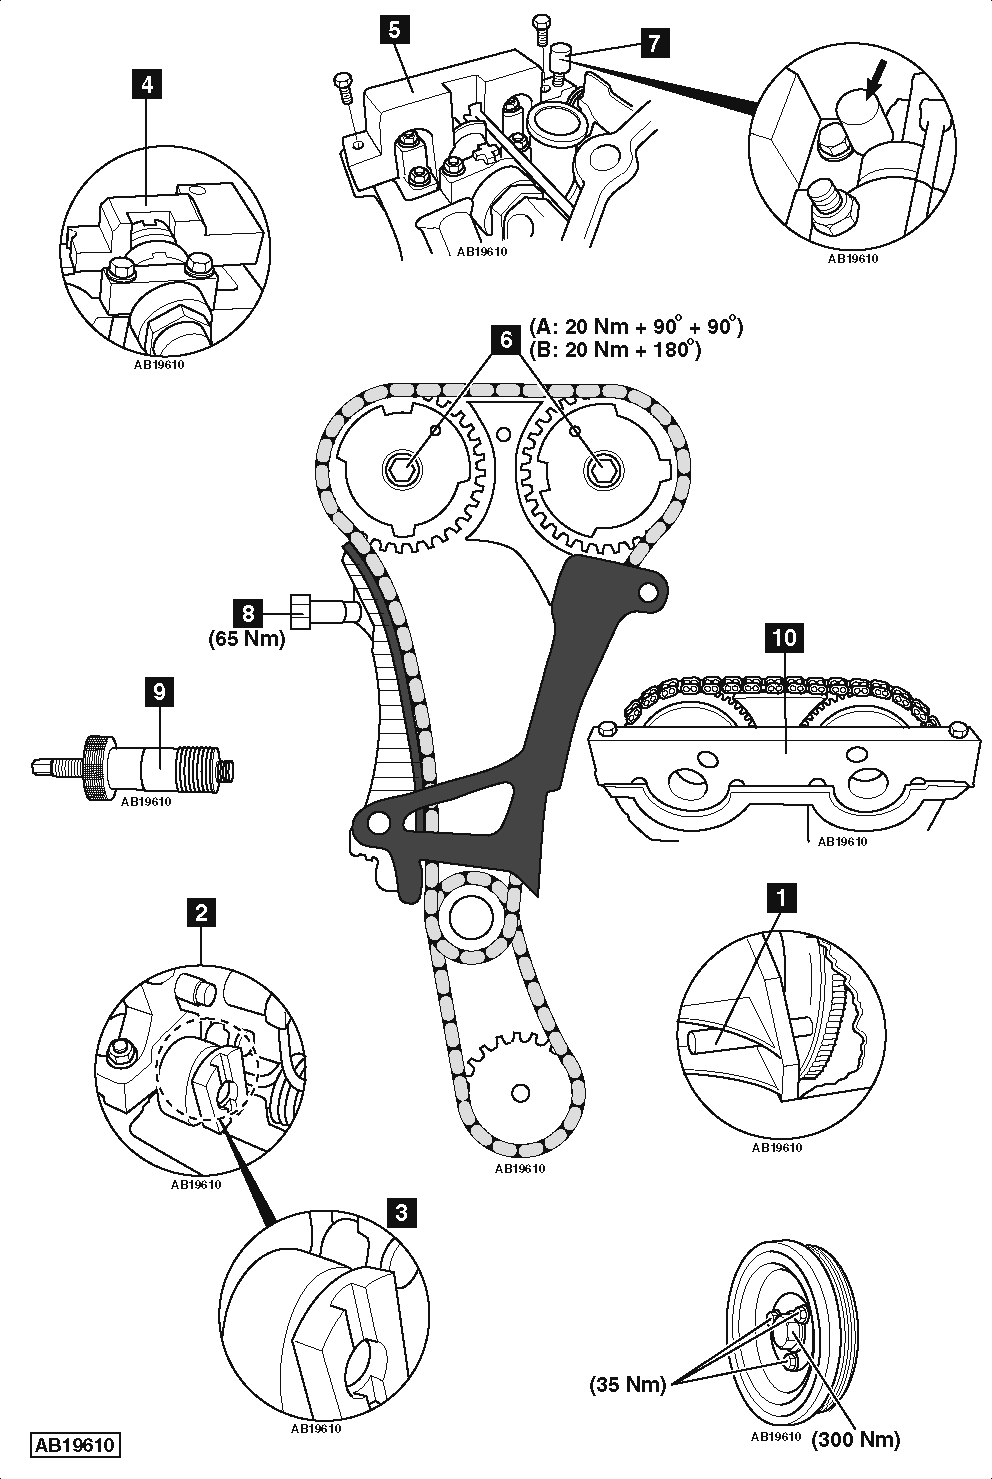
- Install inlet camshaft alignment tool [4] .
- Install exhaust camshaft alignment tool [5] .
- Timing correct when inlet camshaft alignment tool abuts cylinder head or is raised up to a maximum of 0,5 mm on exhaust side. Timing correct when exhaust camshaft alignment tool abuts cylinder head or is raised up to a maximum of 1 mm on exhaust side.
- If not, adjust camshafts as follows:
- Slacken bolt on each camshaft adjuster and then re-tighten by hand [6] .
- Install inlet camshaft alignment tool [4] .
- Align inlet camshaft. Ensure inlet camshaft alignment tool abuts cylinder head.
- Install exhaust camshaft alignment tool [5] .
- Tighten exhaust camshaft alignment tool to cylinder head.
- Tighten bolt on exhaust camshaft alignment tool until it rests on inlet camshaft alignment tool [7] .
- Tighten inlet camshaft alignment tool to cylinder head [4] .
NOTE: Tensioner plunger is spring loaded.
- Remove tensioner [8] .
NOTE: If chain tensioner is to be reused it must be drained of oil. Compress plunger slowly twice.
- Install timing chain pre-tensioning tool [9] .
- Tighten adjusting screw until in contact with guide rail. DO NOT overtighten screw.
- Replace bolt on each camshaft adjuster and re-tighten by hand [6] .
- Install sensor gear alignment tool and secure to cylinder head [10] .
- Slacken bolt of each camshaft adjuster by half a turn [6] .
- Pre-load timing chain with tensioning tool to 0,6 Nm [9] .
NOTE: Bolt for camshaft adjusters MUST only be used once.
- Tighten bolt of each camshaft adjuster [6] .
- A – N40/N45. Tightening sequence:
- First stage – 20 Nm.
- Second stage – 90°.
- Third stage – 90°.
- B – N45T. Tightening sequence:
- First stage – 20 Nm.
- Second stage – 180°.
- Remove flywheel timing pin [1] .
- Remove sensor gear alignment tool [10] .
- Remove camshaft alignment tools [4] & [5] .
- Remove timing chain pre-tensioning tool [9] .
- Install tensioner assembly [8] . Tightening torque: 65 Nm.
- Turn crankshaft two turns clockwise.
- Ensure flywheel timing pin and camshaft alignment tools can be refitted [1] , [4] , [5] & [10] .
- Timing correct when camshaft alignment tools abut cylinder head [4] & [5] .
NOTE: Crankshaft pulley central bolt MUST only be used once.